Snowflake Streams Made Simple

Snowflake streams demystified
The term stream has a lot of usages and meanings in information technology. This is one of the reasons the Snowflake stream feature has excited interest, but also raised confusion. Technologists often use the term stream interchangeably with a platform for handling a real-time data feed, such as Kafka. Snowflake streams are something different.
Often distinctions in technology are subtle. Fortunately this isn’t one of those times. Snowflake streams are nothing like Kafka, Spark Streaming or Flume. They capture change data, i.e., CDC and show the changes in a table. Also, Snowflake streams are not always “streaming”. They capture changes to a table whether they’re happening in a stream, micro-batches, or batch processes.
Why use stream tables
There are lots of reasons. One of the most common is keeping a staging table and production table in sync. Before discussing how, let’s discuss why you might want to have a staging table at all. Why not just process changes directly in the production table?
The main reason is to protect the production table from bad changes. Perhaps a load terminated abnormally due to file corruption, or a delete zapped more rows than planned. It’s better to back off those changes and clean up in a staging table than in a production table. Once you’re satisfied that the changes are ready to promote to production (satisfied by automatic check or manual action), you can use the change data captured in the stream to synchronize the changes to the production table.
Of course, that’s only one reason to use a CDC stream. Since it’s the most straightforward, let’s start with that one. Snowflake streams provide a powerful way to deal with changing data sets. I’ll discuss some very intriguing uses for streams in future posts.
Simplifying how to use streams
The documentation for streams is comprehensive. It covers a great deal of ground, attempting to show every capability and option. In contrast, this article presents a single simplified use case. Specifically, the common use case of pushing all changes to a staging table, and using a CDC stream to control changes to a corresponding production table. Hopefully this will allow the reader to learn from a simple example, tinker with it, and come up with your own uses.
The SQL script walks through the key concepts of Snowflake streams. A subsequent post will elaborate on some key aspects of how and why streams work the way they do. The final two SQL statements merit some discussion. The next to last one shows that a single merge statement can perform 100% of the insert, delete, and update operations in the stream in a single step. Rather than expecting you to reverse-engineer why that is, there’s an annotated SQL explaining how it works. The very last SQL statement is a handy (and in Snowflake very rapid) way to dump any differences between any number of columns in two tables.

-- Set the context. Be sure to use a test database and extra small
-- test warehouse.
use warehouse TEST;
use database TEST;
use role SYSADMIN;
-- Create a schema to test streams
create or replace schema TEST_STREAMS;
-- Create a STAGING table to hold our changed data for our CDC pipeline
create or replace table STAGING
(ID int, CHANGE_NUMBER string, HOW_CHANGED string, FINAL_VALUE string);
-- Create the target PRODUCTION table with a schema identical to STAGING
create or replace table PRODUCTION like STAGING;
-- Create a stream on the STAGING table
create or replace stream STAGING_STREAM on table STAGING;
-- Examine the STAGING table... It's a simple, four-column table:
select * from STAGING;
-- Examine the STAGING_STREAM... It's got 3 new columns called
-- METADATA$ACTION, METADATA$ISUPDATE, and METADATA$ROW_ID
select * from STAGING_STREAM;
-- 1st change to STAGING table
-- Let's insert three rows into the STAGING table:
insert into STAGING (ID, CHANGE_NUMBER, HOW_CHANGED, FINAL_VALUE) values
(1, '1st change to STAGING table', 'Inserted', 'Original Row 1 Value'),
(2, '1st change to STAGING table', 'Inserted', 'Original Row 2 Value'),
(3, '1st change to STAGING table', 'Inserted', 'Original Row 3 Value');
-- Let's look at the STAGING table now to see our three rows:
select * from STAGING;
-- Now, let's look at our stream. Notice there are three "INSERT" metadata
-- actions and three FALSE for metadata "ISUPDATE":
select * from STAGING_STREAM;
-- The documentation for streams discusses how DML operations will advance the
-- position of the stream. Note that a SELECT is *not* a DML operation, and will
-- not advance the stream. Let's run the select again and see all three rows are
-- still there no matter how many times we SELECT from the stream:
select * from STAGING_STREAM;
-- Recall that a Snowflake stream indicates all the changes you need to make
-- to keep a target table (PRODUCTION) in sync with the staging table where the
-- stream is tracking the changes (STAGING). With this preamble, can you guess
-- what will happen when you delete all rows in the staging table *before*
-- you consume the stream?
-- 2st change to STAGING table
delete from STAGING;
-- Let's SELECT from STAGING_STREAM and see what's there:
select * from STAGING_STREAM;
-- There are no rows. Why is this? Why does the stream not show the three
-- inserted rows and then the three deleted rows? Recall the underlying purpose
-- of Snowflake streams, to keep a staging and production table in sync. Since
-- we inserted and deleted the rows *before* we used (consumed) the stream in
-- a DML action, we didn't need to insert and delete the rows to sync the tables.
-- Now, let's reinsert the rows:
-- 3rd change to STAGING table
insert into STAGING (ID, CHANGE_NUMBER, HOW_CHANGED, FINAL_VALUE) values
(1, '3rd change to STAGING table', 'Inserted after deleted', 'Original Row 1 Value'),
(2, '3rd change to STAGING table', 'Inserted after deleted', 'Original Row 2 Value'),
(3, '3rd change to STAGING table', 'Inserted after deleted', 'Original Row 3 Value');
-- Now let's look at the stream again. We expect to see three inserts of the
-- new change:
select * from STAGING_STREAM;
-- Okay, now let's show what happens when you use the stream as part of a DML
-- transaction, which is an INDERT, DELETE, UPDATE, or MERGE:
insert into PRODUCTION
select ID, CHANGE_NUMBER, HOW_CHANGED, FINAL_VALUE from STAGING_STREAM;
-- The rows are in PRODUCTION:
select * from PRODUCTION;
-- But since you've "consumed" the stream (advanced its position by using rows
-- in a DML transaction), this will show no rows:
select * from STAGING_STREAM;
-- Why is this? It's helpful to think of the existence of rows in a stream (strictly
-- speaking, rows past the last consumed position of the stream) as an indication
-- that there have been unprocessed changes in your change data capture stream.
-- To see how this works, let's make some more changes:
-- Update a row to see how the stream responds:
update STAGING
set FINAL_VALUE = 'Updated Row 1 Value',
HOW_CHANGED = 'Updated in change 4'
where ID = 1;
-- Examine the change in the staging table:
select * from STAGING;
-- Since the last time you consumed the stream, you have one UPDATE to process.
-- Let's see what that looks like in the stream:
select * from STAGING_STREAM;
-- There are *two* rows. Why is that? The reason is how Snowflake processes updates.
-- In order to enable Snowflake Time Travel and for technical reasons, Snowflake
-- processes an UPDATE as a DELETE and an INSERT. Note that we can tell this is
-- an update, because there's another column, "METADATA$ISUPDATE" set to TRUE.
-- Let's process this change. We'll start with the DELETE first:
delete from PRODUCTION
where ID in (select ID from STAGING_STREAM where METADATA$ACTION = 'DELETE');
-- We've now deleted row ID 1, let's check it and then do the INSERT:
select * from PRODUCTION;
-- But wait... What happened to the stream? Did it clear out only the DELETE
-- metadata action because that's the only one you used in the DML?
select * from STAGING_STREAM;
-- Answer: ** No **. Even though you didn't use every row in the stream, *any*
-- DML transaction advances the stream to the end of the last change capture.
-- You could use "begin" and "end" to do the INSERT and DELETE one after the
-- other, or we could use UPDATE by checking the "METADATA$ISUPDATE", but I'd
-- like to propose a better, general-purpose solution: MERGING from the stream.
-- Let's see how this works. First, let's get the PRODUCTION table back in sync
-- with the STAGING table:
delete from PRODUCTION;
insert into PRODUCTION select * from STAGING;
-- Now, let's do an INSERT, UPDATE, and DELETE before "consuming" the stream
select * from STAGING;
insert into STAGING (ID, CHANGE_NUMBER, HOW_CHANGED, FINAL_VALUE)
values (4, '5th change to STAGING table', 'Inserted in change 5', 'Original Row 5 value');
update STAGING
set CHANGE_NUMBER = '6th change to STAGING table', HOW_CHANGED = 'Updated in change 6'
where ID = 2;
delete from STAGING where ID = 3;
-- Now your STAGING and PRODUCTION tables are out of sync. The stream captures
-- all changes (change data capture or CDC) needed to process to get the tables
-- in sync:
select * from STAGING_STREAM;
-- Note that we have *FOUR* rows after making one change for each verb
-- INSERT, UPDATE, and DELETE. Recall that Snowflake processes an UPDATE as
-- a DELETE followed by an INSERT, and shows this in the METADATA$ISUPDATE
-- metadata column.
-- What if all you want to do is keep PROD in sync with STAGING, but control
-- when those changes happen and have the option to examine them before
-- applying them? This next DML statement serves as a template to make this
-- use case super easy and efficient:
-- Let's look at the PRODUCTION table first:
select * from PRODUCTION;
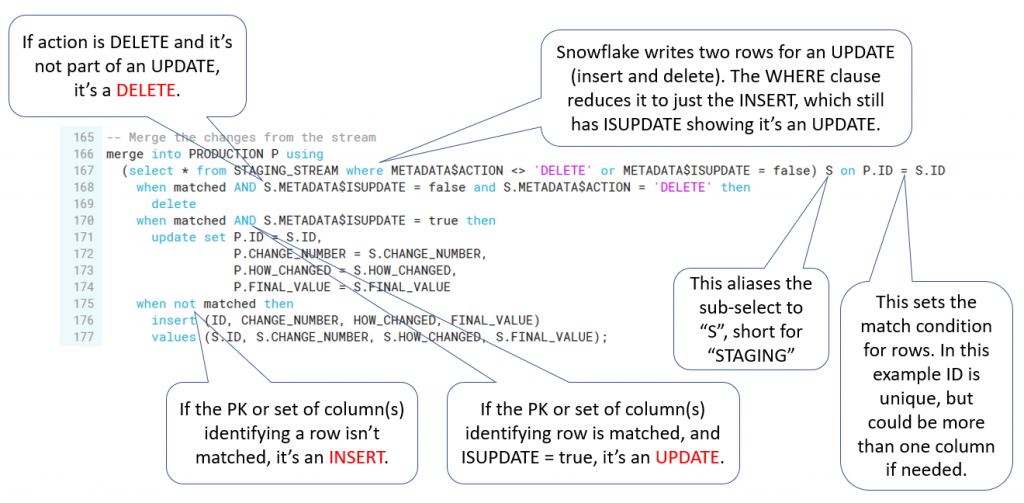
-- Merge the changes from the stream. The graphic below this SQL explains
-- how this processes all changes in one DML transaction.
merge into PRODUCTION P using
(select * from STAGING_STREAM where METADATA$ACTION <> 'DELETE' or METADATA$ISUPDATE = false) S on P.ID = S.ID
when matched AND S.METADATA$ISUPDATE = false and S.METADATA$ACTION = 'DELETE' then
delete
when matched AND S.METADATA$ISUPDATE = true then
update set P.ID = S.ID,
P.CHANGE_NUMBER = S.CHANGE_NUMBER,
P.HOW_CHANGED = S.HOW_CHANGED,
P.FINAL_VALUE = S.FINAL_VALUE
when not matched then
insert (ID, CHANGE_NUMBER, HOW_CHANGED, FINAL_VALUE)
values (S.ID, S.CHANGE_NUMBER, S.HOW_CHANGED, S.FINAL_VALUE);
-- Recall that you did 1 INSERT, 1 UPDATE, and 1 DELETE. The stream captured
-- all three changes, and the MERGE statement above performed all three in one
-- step. Now the PRODUCTION table is in sync with STAGING:
select * from PRODUCTION;
-- We consumed the stream, so it's advanced past any changes to show there's
-- nothing remaining to process:
select * from STAGING_STREAM;
-- We can process CDC streams any way we want, but to synchronize a staging
-- and production table, this MERGE template works great.
-- BTW, here's a handy trick to see if two tables that are supposed to be in
-- sync actually are in sync. There's a complete post on it here:
-- https://snowflake.pavlik.us/index.php/2020/01/08/field-comparisons-using-snowflake/
-- This query will find any mismatched rows:
select P.ID as P_ID,
P.CHANGE_NUMBER as P_CHANGE_NUMBER,
P.HOW_CHANGED as P_HOW_CHANGED,
P.FINAL_VALUE as P_FINAL_VALUE,
S.ID as S_ID,
S.CHANGE_NUMBER as S_CHANGE_NUMBER,
S.HOW_CHANGED as S_HOW_CHANGED,
S.FINAL_VALUE as S_FINAL_VALUE
from PRODUCTION P
full outer join STAGING S
on P.ID = S.ID and
P.CHANGE_NUMBER = S.CHANGE_NUMBER and
P.HOW_CHANGED = S.HOW_CHANGED and
P.FINAL_VALUE = S.FINAL_VALUE
where P.ID is null or
S.ID is null or
P.CHANGE_NUMBER is null or
S.CHANGE_NUMBER is null or
P.HOW_CHANGED is null or
S.HOW_CHANGED is null or
P.FINAL_VALUE is null or
S.FINAL_VALUE is null;
Think of the final MERGE statement as a general-purpose way to merge changes from any staging table’s stream to its corresponding production table. In order to do that; however, you’ll need to modify the template a bit. The following graphic should help explain what’s going on here: