Category: Uncategorized

Snowflake in the Carolinas > Uncategorized
Converting camelCase and SNAKE_CASE

Converting camelCase and SNAKE_CASE

In programming and string matching, use of camelCase and SNAKE_CASE are common. Here are two simple Snowflake UDFs to convert between the two.

create or replace function camelToSnake("s" string)
returns string
language sql
as
$$
    upper(regexp_replace(s,'([A-Z])', '_\\1', 2))
$$;

select camelToSnake('quickBrownFox');

create or replace function snakeToCamel("s" string)
returns string
language javascript
strict immutable
as
$$
const snakeToCamel = str =>
  str.toLowerCase().replace(/([-_][a-z])/g, group => group
      .toUpperCase()
      .replace('-', '')
      .replace('_', '')
  );
return snakeToCamel(s);
$$;

select snakeToCamel('QUICK_BROWN_FOX');
Running Dynamic SQL in Snowflake

Running Dynamic SQL in Snowflake

Use Cases for Dynamic SQL

Dynamic SQL allows you to create and manipulate a string, and then run the resulting string as a SQL statement. Snowflake supports dynamic SQL using the identifier keyword and table() function. There are some notable exceptions; however, where the Snowflake SQL parser currently does not support dynamic SQL.

For example, suppose you want to unload data to stage on a daily basis. To keep the data organized, you decide to put the unloaded data into paths with the current date, like this:

@my_stage/2021-01-22/data.csv  -- Data unloaded daily, organized by date
@my_stage/2021-01-23/data.csv

To accomplish this, you want a single line of SQL to run on a daily basis with the date dynamically generated. The problem is the path in a stage is a string literal that currently does not support using the identifier keyword, variables, or other dynamic SQL methods.

Snowflake Stored Procedures for Dynamic SQL

Writing a stored procedure is one option to run dynamic SQL along these lines. External calls from something like Python or Java can generate and run dynamic SQL. One disadvantage of external code to run dynamic SQL is that it requires external dependencies to schedule and run the code. Stored procedures elimination of any external dependencies offers a major advantage. Because Snowflake tasks also require no external dependencies, it’s possible schedule and run dynamic SQL with no external dependencies.

There are two options for stored procedures to run dynamic SQL. One option is to build the SQL statement inside the stored procedure code. While this approach has advantages, it has a major disadvantage. It requires the creation and maintenance of a new stored procedure for each dynamic SQL statement to run. The other approach is to generate SQL statements outside the stored procedure that a single general-purpose stored procedure runs.

That is the approach the following stored procedure uses. It’s intended to run general-purpose dynamic SQL generated outside the procedure and passed in as a parameter.

For example in the previously cited example, this allows running the daily data offload like this:

call run_dynamic_sql('copy into @mystage/' || current_date || 
     '/data.csv from SNOWFLAKE_SAMPLE_DATA.TPCH_SF1.NATION file_format = (type = CSV)');

A General-Purpose Stored Procedure to Run Dynamic SQL

This stored procedure will run any SQL statement that can be run in a Snowflake stored procedure. The procedure will return a JSON object, either an error indication of a JSON document containing the rows from the execution. Since Snowflake JSON documents have a 16 Mb limit, the stored procedure should return only small result sets. Although intended to execute non-query statements, because it returns a JSON you can use it to convert select query results to JSON.

create or replace procedure RUN_DYNAMIC_SQL("sqlStatement" string)
returns variant
language javascript
execute as caller
as
$$

class Query{
    constructor(statement){
        this.statement = statement;
    }
}

var out = {};
var query = getQuery(sqlStatement);
if (query.error == null) {
    return rsToJSON(query);
} else {
    return {"error": query.error};
}

function rsToJSON(query) {
    var i;
    var row = {};
    var table = [];
    while (query.resultSet.next()) {
        for(col = 1; col <= query.statement.getColumnCount(); col++) {
            row[query.statement.getColumnName(col)] = query.resultSet.getColumnValue(col);
        }
        table.push(row);
    }
    return table;
}

function getQuery(sql){
    var cmd = {sqlText: sql};
    var query = new Query(snowflake.createStatement(cmd));
    try {
        query.resultSet = query.statement.execute();
    } catch (e) {
        query.error = e.message;
    }
    return query;
}
$$;

-- Usage samples:

-- Create a table. Note the use of $$ to define strings to avoid problems with single quotes
call run_dynamic_sql($$ create or replace temp table foo(v variant) $$);

-- Run a select statement. While this SP is intended to execute non queries, it will also
-- Return a query's result set as a JSON as long as the JSON is under 16 MB in size.
call run_dynamic_sql($$ select * from "SNOWFLAKE_SAMPLE_DATA"."TPCH_SF1"."NATION" $$);

-- Show an example copying into a dynamically-named path in a stage:
-- Create a scratch stage for the test
create or replace stage my_stage;

-- Set a variable for the path
set today = current_date;

select $today;

-- Build the copy command. Use ' or $$ to terminate strings as convenient.
set copycommand = 'copy into @my_stage/' || $TODAY || '/data.csv' ||
$$ from "SNOWFLAKE_SAMPLE_DATA"."TPCH_SF1"."NATION" file_format = (type = CSV, field_optionally_enclosed_by = '"') $$;

-- Examine the statement to make sure it looks okay
select $copycommand;

-- Copy the file to the dynamic path
call run_dynamic_sql($copycommand);

create stage mystage;
call run_dynamic_sql('copy into @mystage/' || current_date || '/data.csv from SNOWFLAKE_SAMPLE_DATA.TPCH_SF1.NATION file_format = (type = CSV)');

Getting Snowflake’s Current Timezone

Getting Snowflake’s Current Timezone

Snowflake’s built-in way to get the current timezone is using the SHOW statement, like this:

show parameters like 'TIMEZONE';

If you’re running the statement from a command line, this isn’t a problem. If you need it programmatically, the SHOW command has two key limitations. First, you can’t use it in a stored procedure. Second, if you use it in a SQL script running externally, you have to get the results of the SHOW statement in second query using RESULT_SCAN.

One of my customers needed a way to get and current timezone in a single call and use it in a stored procedure. Since JavaScript has built-in functions, it’s possible to use a UDF to get the current time zone that way:

create or replace function GET_CURRENT_TIMEZONE()
returns string
language javascript
as
$$
    return Intl.DateTimeFormat().resolvedOptions().timeZone;
$$;

-- Test the UDF:
select get_current_timezone();
alter session set TIMEZONE = 'America/Chicago';
select get_current_timezone();
alter session set TIMEZONE = 'America/New_York';
select get_current_timezone();
Geolocation of IP Addresses in Snowflake – Part 3

Geolocation of IP Addresses in Snowflake – Part 3

Programming Note

This is a continuation of the Part 1 and Part 2 of this series. Since considerable time has passed and changes made to the testing since posting those articles, this post will start from the beginning.

The Business Case for Geolocating IP Numbers

Business intelligence and data science teams can get valuable insights knowing the geolocation of website visitors. Suppose a product launch gets lots of web traffic, but the only source of information on visitors is the web log. Some web server statistics report on traffic grouped by nation, but what if we want to get much more granular information and incorporate this information with the main data warehouse?

The First Step – Getting Web Visitor IP Numbers

Let’s take one sample web server among many, Apache Web Server, and quickly examine the structure of a log entry. Here’s a line in a sample Apache Web Server log.

64.242.88.10 - - [07/Mar/2004:16:05:49 -0800] "GET /twiki/bin/edit/Main/Double_bounce_sender?topicparent=Main.ConfigurationVariables HTTP/1.1" 401 12846

In the Apache documentation, we can get more detailed information on the meaning of each field in the line, but for now we’re going to concentrate on 1) how to load the web logs into Snowflake, and 2) the key aspects for business intelligence and geolocation.

Importing Web Log Data

Loading the data is a quick proposition. Even without reading the Apache documentation it’s clear that the web log is space delimited and wraps any fields with spaces inside double quotes. Snowflake provides a very simple way to ingest structured data in flat files using File Formats. You can create a file format using SnowSQL (documented here: https://docs.snowflake.net/manuals/sql-reference/sql/create-file-format.html) or you can use the Snowflake Web UI (documented here: https://docs.snowflake.net/manuals/user-guide/data-load-web-ui.html#step-1-open-the-load-data-wizard).

Note: Although the Apache Web Log is space delimited, we will use the CSV option for the Snowflake File Format — simply change the delimiter from a comma to a space.

Note: For this exercise, we’ll use a database named WEBLOG. The Apache Web Server data will go into a schema named APACHE_WEB_SERVER, and the geolocating data will go in a schema named IP2LOCATION. You can change the sample code as necessary if you’d prefer to use another database or different schema names.

Here is the Snowflake File Format you can use to import Apache Web Server logs:

ALTER FILE FORMAT "WEBLOG"."APACHE_WEB_SERVER".APACHE_WEB_LOG SET COMPRESSION = 'AUTO'
FIELD_DELIMITER = ',' RECORD_DELIMITER = '\n' SKIP_HEADER = 1 
FIELD_OPTIONALLY_ENCLOSED_BY = '\042' TRIM_SPACE = FALSE ERROR_ON_COLUMN_COUNT_MISMATCH = FALSE
ESCAPE = 'NONE' ESCAPE_UNENCLOSED_FIELD = '\134' DATE_FORMAT = 'AUTO'
TIMESTAMP_FORMAT = 'AUTO' NULL_IF = ('');

Where to Get Sample Apache Web Server Logs

One of the thing needed to test geolocating a web server log is, well, a web server log. As it turns out, this is not an easy thing to do. After some research, I located a partially obfuscated Apache web log from the US Securities and Exchange Commission (SEC) available here:

https://www.sec.gov/dera/data/edgar-log-file-data-set.html

Their weblogs obfuscate the final quad of the IPv4 dotted quad, so they look like this: 192.168.1.jjr.

After loading the data, we now need to geolocate the web hits. Problem: the Apache Web Server log, as most web logs, does not show anything for geolocation. Fortunately in most cases, we can use the visitor’s IP address to get fairly accurate geolocation.

Later in this article, we’ll show how to convert the partially obfuscated IP dotted quad for use in geolocation.

Where to Get IP Number Geolocation Databases

Third party services keep up to date databases of IPv4 and IPv6 geolocation data. Once such service I found at https://lite.ip2location.com includes free databases with less rich information than the paid versions. In my testing I found the free databases accurate and useful, though production BI or data science work should consider the paid versions.

Another source available through Snowflake’s Data Marketplace is ipinfo.io. I have not tested their IP geolocation data source, but the schema is similar to the one provided by IP2Location and the two should work similar in this article. One advantage of using Snowflake’s Data Marketplace is that the partner keeps the data up to date using Snowflake data sharing.

If you use the IP2Location free database, here is a Snowflake File Format to import the data:

ALTER FILE FORMAT "WEBLOG"."IP2LOCATION".IP2LOCATION SET COMPRESSION = 'AUTO' 
FIELD_DELIMITER = ',' RECORD_DELIMITER = '\n' SKIP_HEADER = 0 
FIELD_OPTIONALLY_ENCLOSED_BY = '\042' TRIM_SPACE = TRUE ERROR_ON_COLUMN_COUNT_MISMATCH = TRUE
ESCAPE = 'NONE' ESCAPE_UNENCLOSED_FIELD = '\134' DATE_FORMAT = 'AUTO'
TIMESTAMP_FORMAT = 'AUTO' NULL_IF = ('\\N');

After copying the file to a stage named IP2LOCATION, You can then copy the data into a table using this COPY INTO statement:

create table IP_TO_LOCATION as
select  $1::int as START_IP,
        $2::int as END_IP,
        $3::string as ISO_COUNTRY,
        $4::string as COUNTRY,
        $5::string as STATE_PROVINCE,
        $6::string as CITY,
        $7::double as LATITUDE,
        $8::double as LONGITUDE,
        $9::string as POSTAL_CODE,
        $10::string as TZ_OFFSET
from @IP2LOCATION (file_format => 'IP2LOCATION');

Preparing the Data

The next question is how to resolve millions or billions of web log lines’ IP address to approximate geolocation. This is where Snowflake shines. The IP2Location LITE comes as a flat structured file with millions of rows After creating another Snowflake File Format, it’s an easy matter to turn the IP2Location flat file into a Snowflake table. From there, Snowflake’s powerful massive-scale join make it a simple matter to create a joined view that shows the IP’s approximate location.

Before using the geolocation data, there’s a data preparation item to get it working. The IP2Location data comes with IPs represented by 32-bit integers, not the familiar dotted quad notation. This makes it much easier to use code and database routines that search for ranges of IPs that all happen to be in the same area by specifying a lower and upper range for the IP number.

IP Dotted Quad:     IP 32-bit Integer, Decimal
192.168.1.1         3232235777

This means we need to convert our dotted quad values into 32-bit integer values. Fortunately, Snowflake makes that easy with a UDF (User Defined Function):

--Convert an IPv4 Dotted Quad into an IP Number
create or replace function IpToInteger(ipAddress varchar)
  returns double 
  language javascript
  strict
  as '
     
    var ipQuad = IPADDRESS.split(".");
  
    var quad1 = parseInt(ipQuad[0]);
    var quad2 = parseInt(ipQuad[1]);
    var quad3 = parseInt(ipQuad[2]);
    var quad4 = parseInt(ipQuad[3]);
    return (quad1 * 16777216) + (quad2 * 65536) + (quad3 * 256) + quad4;
 
  ';

Simulating the Partially Obfuscated IP Number:

If you don’t have your own web logs and are using the ones mentioned in this article from the SEC, they obfuscate the final quad of the IPv4 dotted quad, so they look like this: 192.168.1.jjr.

According to the SEC’s documentation, their method will always replace the final number from 0 to 255 with the same three-letter value. The SEC does not disclose that “jjr” maps to something like 134, but for the purposes of this test it’s acceptable to assign all 256 unique three letter replacements with numbers from 0 to 255.

After downloading the log file named “log20170630.zip”, we need to load it to a stage and use a file format to parse it. Here is the file format I used:

ALTER FILE FORMAT "TEST"."IP2LOCATION".IP_LOG SET COMPRESSION = 'AUTO' FIELD_DELIMITER = ','
RECORD_DELIMITER = '\n' SKIP_HEADER = 1 FIELD_OPTIONALLY_ENCLOSED_BY = 'NONE' TRIM_SPACE = TRUE
ERROR_ON_COLUMN_COUNT_MISMATCH = TRUE ESCAPE = 'NONE' ESCAPE_UNENCLOSED_FIELD = '\134'
DATE_FORMAT = 'AUTO' TIMESTAMP_FORMAT = 'AUTO' NULL_IF = ('\N');

After loading the data into a table (I called mine IP_TO_LOCATION in the WEBLOG database and IP2LOCATION schema), the next thing to do is replace the three-letter obfuscated replacements with numbers from 0 through 255. To do this, I ran an ELT process replace these values using these steps:

Step 1: Create a new table with all the columns from the original web log, plus a new column to hold the last three characters of the IP number (the three-letter replacement).

Step 2: Create a table with each of the distinct values in the new column. There will be 256 representing numbers from 0 through 255. For the purposes of this exercise, it is not important which numbers map to which three-letter replacements, so I assigned them in sequential order from 0 through 255 in the order returned in the select distinct query. I called these IP numbers simulated, even though only the final quad of the dotted quads is simulated.

Step 3: Convert the IP dotted quads into IP numbers using the UDF in Part 1 of this series. The SQL looks like this:

create table WEB_LOG_ENRICHED as
(
select IpToInteger(SIMULATED_IP) as IP_NUMBER,
IP, SIMULATED_QUAD, SIMULATED_IP, REQUEST_DATE, REQUEST_TIME, ZONE, CIK, ACCESSION,
EXTENSION, CODE, SIZE, IDX, NOREFER, NOAGENT, FIND, CRAWLER, BROWSER 
from IP_LOG) -- Note: IP_LOG holds the raw Apache Web Server logs

Simulating the IP Numbers at Scale

I was concerned about performance running a Javascript UDF millions of 20,488,579 times to convert IP dotted quads into IP numbers. It turned out I needn’t have been concerned. Snowflake converted all 20.5 million in 16.97 seconds using an Extra Small (XS) warehouse. Out of curiosity, I dropped the resulting table and increased the size of the warehouse to a medium (M) and it ran in 7.85 seconds. This provides empirical evidence that increasing the warehouse size improves performance including those with UDFs.

This led me to the final part of the experiment — resolving the IP numbers in the web log to the geolocations. We have the IP numbers in the a log table, and the IP geolocations in another. My first thought was to join the tables, but this is an unusual join. The standard join matches keys. In this example, we need to use inequalities to join the table. In other words, join the IP log information with the geolocation data where the IP log’s IP number falls between the lower and upper bounds of a locations address range.

Geolocating the Web Hits

This leads to the final part of the experiment — resolving the IP numbers in the web log to the geolocations. We have the IP numbers in the a log table, and the IP geolocations in another. My first thought was to join the tables, but this is an unusual join. The standard join matches keys. In this example, we need to use inequalities to join the table. In other words, join the IP log information with the geolocation data where the IP log’s IP number falls between the lower and upper bounds of a locations address range.

select * from "WEBLOG"."APACHE_WEB_SERVER"."WEB_LOG_ENRICHED" W
left join "WEBLOG"."IP2LOCATION"."IP_TO_LOCATION" L
on W.IP_INT >= L.START_IP and W.IP_INT <= L.END_IP limit 100;

While this works, the performance was not practical for at scale usage. In this test, geocoding 100 web log entries on an extra small warehouse (single node) took about 30 seconds. That simply won’t scale.

Performance Tuning the Geolocation

In most cases the first step in improving a Snowflake query is examining the query profiler. Here’s the query profile for the first test run of the geolocation:

Query Profile on Cartesian Join

The left outer join seems to be the culprit here. It turns out Snowflake’s optimizer doesn’t particularly like doing a left outer join on an inequality. The interesting thing about that is this should be a one to one relationship. For each IP number in the web log, there should be exactly one row where that IP number falls into the right range.

This allows us to do a cartesian join instead:

select * from "WEBLOG"."APACHE_WEB_SERVER"."WEB_LOG_ENRICHED" W
 inner join "WEBLOG"."IP2LOCATION"."IP_TO_LOCATION" L
    on W.IP_INT >= L.START_IP and W.IP_INT <= L.END_IP limit 500000; 

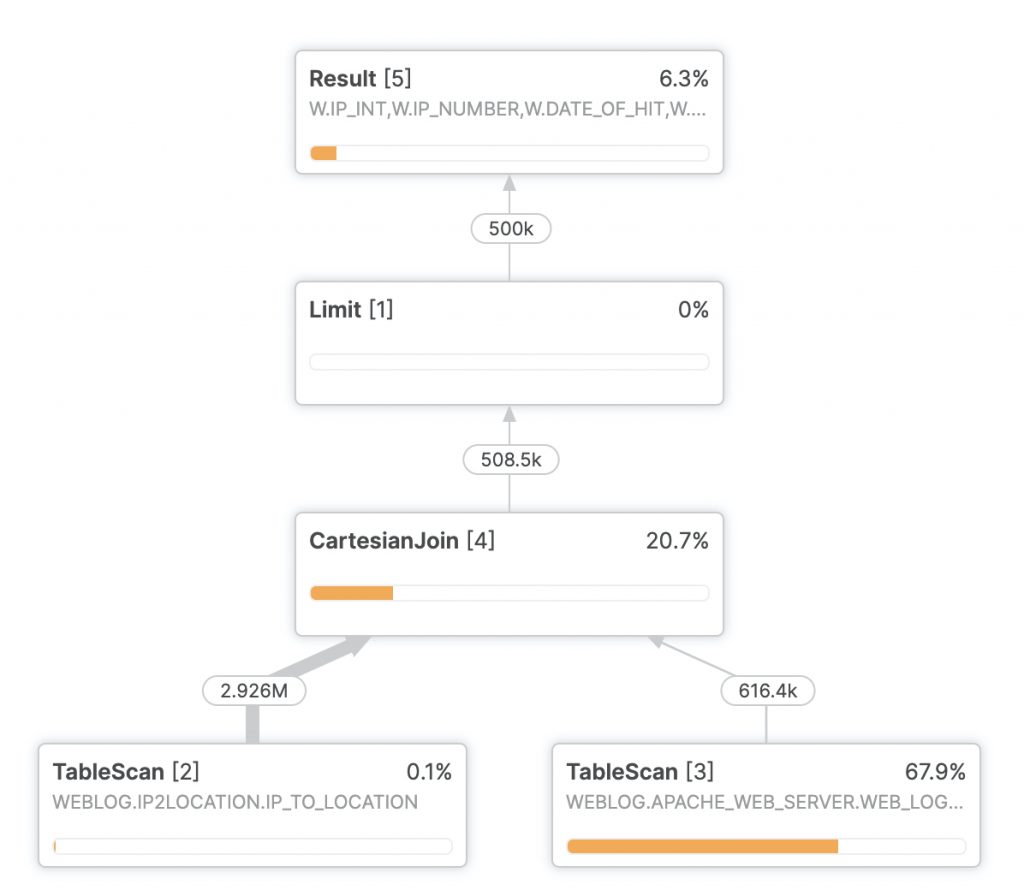
This leads to a query profile like this:

Query Profile of CartesianJoin

More important, it leads to performance like this on an extra small warehouse:

After running an initial query that took a few seconds and got the critical IP geolocation table into the cache, geolocating half a million web log entries took just five seconds.

Least Privilege Access to Monitor Snowflake Usage

Least Privilege Access to Monitor Snowflake Usage

The SNOWFLAKE Database

All Snowflake accounts should have a database named SNOWFLAKE. It’s a shared database, using Snowflake’s secure data sharing.

If you set up your Snowflake account before the spring of 2019, you may need to import the shared database. If you don’t see the SNOWFLAKE database in your account and don’t see it as an inbound share, contact Snowflake Support.

Snowflake, Inc. (the company) unsurprisingly runs a number of its own Snowflake accounts. The SNOWFLAKE database in your account is an inbound share from the Snowflake, Inc. account running on your cloud provider and region.

Because the SNOWFLAKE database contains information on usage and metering, by default only the ACCOUNTADMIN role has privileges to select on the views.

Attempting Grants on the SNOWFLAKE Database

Without this background, it’s possible to conclude improperly that only the ACCOUNTADMIN can access the views in the SNOWFLAKE database. Here’s why:

-- A user may try something like this:
use role ACCOUNTADMIN;
grant select on "SNOWFLAKE"."ACCOUNT_USAGE"."QUERY_HISTORY" to role SYSADMIN;

This will result in the error Grant not executed: Insufficient privileges.

The ACCOUNTADMIN is the most powerful role in a Snowflake account. Because of this, a person may conclude that there’s no way to grant privileges on the “special” SNOWFLAKE database.

Granting Privileges on SNOWFLAKE to Human Users

As previously discussed, the only thing special about the SNOWFLAKE database is it’s an inbound shared database. You can grant access to the SNOWFLAKE database the same way you do for any other inbound shared database:

use role ACCOUNTADMIN;
grant imported privileges on database SNOWFLAKE to role SYSADMIN;
use role SYSADMIN; -- Remember to always get out of the ACCOUNTADMIN role when done using it.

This will grant select on all views in the SNOWFLAKE database to the SYSADMIN role. It’s up to your organization whether or not you want to grant this access. Personally, I recommend it. It allows users with SYSADMIN role but not ACCOUNTADMIN role to monitor usage. It also allows users with ACCOUNTADMIN role to use least privilege to access this information without changing roles to ACCOUNTADMIN. Any time a user changes to ACCOUNTADMIN it’s possible to forget to get out of that role. That risks performing other actions such as creating object that generally shouldn’t be done in that role.

Granting Privileges on SNOWFLAKE to Machine Users

If granting access to the SNOWFLAKE database is for a dashboard or machine user, you can do something like this:

-- You must use the ACCOUNTADMIN role to assign the required privileges
use role ACCOUNTADMIN;
 
-- Optionally create a warehouse to monitor Snowflake activity.
-- Only create a warehouse dedicated to account usage if there are several
-- clients (performance monitors, BI packages, etc.) using it.
create or replace warehouse MONITOR_SNOWFLAKE warehouse_size = 'X-Small';
 
-- Create a new role intended to monitor Snowflake usage.
create or replace role MONITOR_SNOWFLAKE;
 
-- Grant privileges on the SNOWFLAKE database to the new role.
grant imported privileges on database SNOWFLAKE to role MONITOR_SNOWFLAKE;
 
-- Create a user.
create or replace user    SNOWFLAKE_MONITOR
    LOGIN_NAME          = SNOWFLAKE_MONITOR
    password            = 'My_Password_123!'
    default_warehouse   = MONITOR_SNOWFLAKE
    default_role        = MONITOR_SNOWFLAKE
    default_namespace   = SNOWFLAKE.ACCOUNT_USAGE
--  rsa_public_key      = 'MIIBIjANBgkqh...' -- Optional, see note.
;
 
-- Note: Snowflake recommends using key authentication for machine users:
-- https://docs.snowflake.com/en/user-guide/snowsql-start.html#using-key-pair-authentication
 
-- Grant usage on the warehouse used to monitor Snowflake.
grant usage on warehouse MONITOR_SNOWFLAKE to role MONITOR_SNOWFLAKE;
 
-- Grant the monitor role to the user.
grant role MONITOR_SNOWFLAKE to user SNOWFLAKE_MONITOR;
 
-- Get out of the ACCOUNTADMIN role when done.
use role SYSADMIN;

Increasing Granularity of the Grants

Let’s discuss more granular access to the views in an imported shared database. Privileges on the imported shared database itself are all or nothing. If you want to control access with more granularity, create a set of “select * from…” views selecting from the SNOWFLAKE database. You can then manage the grants on those views individually.

Getting Snowflake Primary Key Columns as a Table

Getting Snowflake Primary Key Columns as a Table

One of my customers had an interesting requirement. In order to dynamically create merge statements, they needed a way to collect the primary key columns for any given table. After discussing some options — returning them as a delimited string, array, etc., we agreed that returning the columns in a table is the best option.

This User Defined Table Function (UDTF) returns the columns for a table’s primary key. The UDTF will return a table with a single column, each row in the table is one of the columns in the input table’s primary key. If there is no primary key, the table will have no rows. For a single-column primary key, the table will have the one row, and for composite primary keys it will return all columns in the key.

One thing you may notice is that the input to the UDTF is the table’s DDL, not just the table’s name. The reason for this is because UDTFs cannot execute SQL. The simplest way to handle this situation is to nest the GET_DDL function as the parameter for the GET_PK_COLUMNS function. You can see how this works in the code samp

create database DB_Primary_Keys;

/**************************************************************************************************************
*                                                                                                             *
*  Set up test tables with four types of primary key: Named composite, unnamed composite, inline, and none.   * 
*                                                                                                             *
**************************************************************************************************************/
 
-- Named multi-column PK
create or replace temporary table table1
(
column_name1 number NOT NULL,
column_name2 number NOT NULL,
column_name3 string,
CONSTRAINT Constraint_name PRIMARY KEY (column_name1, column_name2)
);
 
-- Unnamed multi-column PK
create temporary table table2
(
column_name1 number NOT NULL,
column_name2 number NOT NULL,
column_name3 string,
PRIMARY KEY (column_name1, column_name2)
);
 
-- Inline single-column PK
create or replace temporary table table3
(
column_name1 number primary key,
column_name2 number NOT NULL,
column_name3 string
);
 
-- No PK defined
create or replace temporary table table4
(
column_name1 number,
column_name2 number,
column_name3 string
);
 
/********************************************************************************************************
*                                                                                                       *
* User defined table function (UDTF) to get primary keys for a table.                                   *
*                                                                                                       *
* @param  {string}:  TABLE_DDL    The DDL for the table to get the PKs. Usually use get_ddl.            *
* @return {table}:                A table with the columns comprising the table's primary key           *
*                                                                                                       *
********************************************************************************************************/
create or replace function GET_PK_COLUMNS(TABLE_DDL string)
returns table (PK_COLUMN string)
language javascript
as
$$
{
    processRow: function get_params(row, rowWriter, context){
        var pkCols = getPKs(row.TABLE_DDL);
        for (i = 0; i < pkCols.length; i++) {
            rowWriter.writeRow({PK_COLUMN: pkCols[i]}); 
        }
         
        function getPKs(tableDDL) {
            var c;
            var keyword = "primary key";
            var ins = -1;
            var s = tableDDL.split("\n");
            for (var i = 0; i < s.length; i++) {  
                ins = s[i].indexOf(keyword);
                if (ins != -1) {
                    var colList = s[i].substring(ins + keyword.length);
                    colList = colList.replace("(", "");
                    colList = colList.replace(")", "");
                    var colArray = colList.split(",");
                    for (pkc = 0; c < colArray.length; pkc++) {
                        colArray[pkc] = colArray[pkc].trim();
                    }
                    return colArray;
                }
            }
            return [];  // No PK
        }
    }
}
$$;
 
/**************************************************************************************************************
*                                                                                                             *
*  Test execution of the UDTF.                                                                                * 
*                                                                                                             *
**************************************************************************************************************/
 
select * from table(get_pk_columns(get_ddl('table', 'table1'))) PKS;  -- Multi-column PK with named constraint
select * from table(get_pk_columns(get_ddl('table', 'table2'))) PKS;  -- Multi-column PK with no name for constraint
select * from table(get_pk_columns(get_ddl('table', 'table3'))) PKS;  -- Single column PK inline definition
select * from table(get_pk_columns(get_ddl('table', 'table4'))) PKS;  -- No PKs
Oracle to Snowflake Table DDL Conversion

Oracle to Snowflake Table DDL Conversion

Jason Trewin at FreshGravity provided this Oracle to Snowflake Table DDL conversion script. FreshGravity is a great Snowflake partner, and Jason is working on his second Snowflake deployment for our shared customers.

He shared a great approach to DDL conversion from Oracle to Snowflake. I thought it was so useful that after some discussion he agreed to let me write up and post on it.

You can modify the where clauses to select the tables you need to convert, and modify the mappings from Oracle table owners to Snowflake owners.

Thanks and credit to Jason Trewin for contributing this useful script to the Snowflake community.

-- Script contributed to the Snowflake community courtesy of Jason Trewin at FreshGravity.

SELECT 'CREATE OR REPLACE TABLE '  
        || NEW_SCHEMA_NAME
        || '.' ||  TABLE_NAME || ' (' || LISTAGG(COLUMN_NAME || ' ' || CONVERTED_DATA_TYPE || CASE WHEN NULLABLE = 'N' THEN ' NOT NULL' ELSE ''END , ' , ') WITHIN GROUP (ORDER BY COLUMN_ID)  || ');' --AS COLUMN_LIST
   FROM (      
 SELECT DATA_TYPE, COLUMN_NAME, ALL_TABLES.TABLE_NAME, ALL_TABLES.OWNER,DATA_LENGTH, DATA_PRECISION, DATA_SCALE, NULLABLE,
        CASE WHEN INSTR(DATA_TYPE,'WITH LOCAL TIME ZONE') > 0  THEN 'TIMESTAMP_TZ'
             WHEN INSTR(DATA_TYPE,'TIMESTAMP') > 0 THEN 'TIMESTAMP_NTZ'
             WHEN DATA_TYPE = 'DATE' THEN 'DATE'
             WHEN DATA_TYPE = 'XMLTYPE' THEN 'VARIANT'
             WHEN DATA_TYPE IN ('BINARY_DOUBLE','NUMBER') THEN 'NUMBER'||
                  CASE WHEN DATA_PRECISION IS NOT NULL THEN  '('|| DATA_PRECISION || ',' || NVL(DATA_SCALE,0) || ')'
                            ELSE '' END
             WHEN DATA_TYPE IN ('NVARCHAR2','VARCHAR2','VARCHAR','NVARCHAR') THEN 'TEXT(' || DATA_LENGTH  || ')'
             WHEN DATA_TYPE IN ('NCHAR','CHAR') THEN 'TEXT(1)'
             WHEN DATA_TYPE = 'CLOB' THEN 'TEXT(16777216)'
             ELSE NULL END AS CONVERTED_DATA_TYPE
             ,CASE WHEN ALL_TABLES.OWNER = 'ORACLE_OWNER_1' THEN 'SNOWFLAKE_OWNER_1'  -- Map Oracle owners to Snowflake owners.
                   WHEN ALL_TABLES.OWNER = 'ORACLE_OWNER_2' THEN 'SNOWFLAKE_OWNER_2'
                   WHEN ALL_TABLES.OWNER = 'ORACLE_OWNER_3' THEN 'SNOWFLAKE_OWNER_3'                                      
                   WHEN ALL_TABLES.OWNER = 'ORACLE_OWNER_4' THEN 'SNOWFLAKE_OWNER_4'
				   WHEN ALL_TABLES.OWNER = 'ORACLE_OWNER_5' THEN 'SNOWFLAKE_OWNER_5'  
                   WHEN ALL_TABLES.OWNER = 'ORACLE_OWNER_6' THEN 'SNOWFLAKE_OWNER_6'                                      
               ELSE NULL END AS NEW_SCHEMA_NAME
             ,COLUMN_ID
  FROM ALL_TAB_COLUMNS
       INNER JOIN ALL_TABLES   
          ON ALL_TABLES.TABLE_NAME  =  ALL_TAB_COLUMNS.TABLE_NAME
         AND ALL_TABLES.OWNER       =  ALL_TAB_COLUMNS.OWNER
WHERE	-- Insert a where clause to decide which tables to include or exclude. This is just part of one approach: 
	ALL_TABLES.TABLE_NAME NOT IN ('TABLE1','TABLE2','TABLE3')
  )
GROUP BY NEW_SCHEMA_NAME, TABLE_NAME


SELECT TEXT_LINE FROM (
SELECT 1 AS INDEXING_VALUE,
     TABLE_NAME ,
     OWNER,
        'CREATE OR REPLACE TABLE '  
        || CASE WHEN ALL_TABLES.OWNER = 'ORACLE_OWNER_1' THEN 'SNOWFLAKE_OWNER_1'  		-- Map Oracle table ownwers to Snowflake table owners
                WHEN ALL_TABLES.OWNER = 'ORACLE_OWNER_2' THEN 'SNOWFLAKE_OWNER_2'
                WHEN ALL_TABLES.OWNER = 'ORACLE_OWNER_3' THEN 'SNOWFLAKE_OWNER_3'                                      
                WHEN ALL_TABLES.OWNER = 'ORACLE_OWNER_4' THEN 'SNOWFLAKE_OWNER_4'
                WHEN ALL_TABLES.OWNER = 'ORACLE_OWNER_5' THEN 'SNOWFLAKE_OWNER_5'  
                WHEN ALL_TABLES.OWNER = 'ORACLE_OWNER_6' THEN 'SNOWFLAKE_OWNER_6'                                      
           ELSE NULL END         || '.' ||  TABLE_NAME || '(' AS TEXT_LINE, 1 AS COLUMN_ID
  FROM ALL_TABLES   
WHERE ALL_TABLES.OWNER LIKE 'ORACLE_OWNER_%'	-- Set where condition for tables to process.
AND ALL_TABLES.TABLE_NAME IN ('TABLE1', 'TABLE2', 'TABLE3')
UNION ALL
SELECT 2  AS INDEXING_VALUE, ALL_TABLES.TABLE_NAME , ALL_TABLES.OWNER,
        CASE WHEN COLUMN_ID = 1 THEN '' ELSE ',' END || COLUMN_NAME || ' ' ||
            CASE WHEN INSTR(DATA_TYPE,'WITH LOCAL TIME ZONE') > 0  THEN 'TIMESTAMP_TZ'
             WHEN INSTR(DATA_TYPE,'TIMESTAMP') > 0 THEN 'TIMESTAMP_NTZ'
             WHEN DATA_TYPE = 'DATE' THEN 'DATE'
             WHEN DATA_TYPE = 'XMLTYPE' THEN 'VARIANT'
             WHEN DATA_TYPE IN ('BINARY_DOUBLE','NUMBER') THEN 'NUMBER'||
                  CASE WHEN DATA_PRECISION IS NOT NULL THEN  '('|| DATA_PRECISION || ',' || NVL(DATA_SCALE,0) || ')'
                            ELSE '' END
             WHEN DATA_TYPE IN ('NVARCHAR2','VARCHAR2','VARCHAR','NVARCHAR') THEN 'TEXT(' || DATA_LENGTH  || ')'
             WHEN DATA_TYPE IN ('NCHAR','CHAR') THEN 'TEXT(1)'
             WHEN DATA_TYPE = 'CLOB' THEN 'TEXT(16777216)'
             ELSE NULL END ||  CASE WHEN NULLABLE = 'N' THEN ' NOT NULL' ELSE ''END  AS CONVERTED_DATA_TYPE
           ,COLUMN_ID
  FROM ALL_TAB_COLUMNS
       INNER JOIN ALL_TABLES   
          ON ALL_TABLES.TABLE_NAME  =  ALL_TAB_COLUMNS.TABLE_NAME
         AND ALL_TABLES.OWNER       =  ALL_TAB_COLUMNS.OWNER
WHERE ALL_TABLES.OWNER LIKE 'ODS_%'
AND ALL_TABLES.TABLE_NAME IN ('TABLE1', 'TABLE2', 'TABLE3') 
 UNION ALL SELECT 3 AS INDEXING_VALUE,
     TABLE_NAME , OWNER,
        ');', 1 AS COLUMN_ID
  FROM ALL_TABLES   
WHERE ALL_TABLES.OWNER LIKE 'ORACLE_OWNER_%'
AND ALL_TABLES.TABLE_NAME IN ('TABLE1', 'TABLE2', 'TABLE3')
)
ORDER BY TABLE_NAME, OWNER, INDEXING_VALUE, COLUMN_ID


SELECT  'ALTER TABLE '
        || CASE WHEN ALL_TABLES.OWNER = 'ORACLE_OWNER_1' THEN 'SNOWFLAKE_OWNER_1'  		-- Map Oracle table ownwers to Snowflake table owners
                WHEN ALL_TABLES.OWNER = 'ORACLE_OWNER_2' THEN 'SNOWFLAKE_OWNER_2'
                WHEN ALL_TABLES.OWNER = 'ORACLE_OWNER_3' THEN 'SNOWFLAKE_OWNER_3'                                      
                WHEN ALL_TABLES.OWNER = 'ORACLE_OWNER_4' THEN 'SNOWFLAKE_OWNER_4'
                WHEN ALL_TABLES.OWNER = 'ORACLE_OWNER_5' THEN 'SNOWFLAKE_OWNER_5'  
                WHEN ALL_TABLES.OWNER = 'ORACLE_OWNER_6' THEN 'SNOWFLAKE_OWNER_6'                                       
           ELSE NULL END         || '.' ||  TABLE_NAME
        || ' ADD PRIMARY KEY (' ||PK_COLUMMN_LIST || ');'
FROM 
 (
SELECT --'ALTER TABLE ' 
       COLS.OWNER, COLS.TABLE_NAME, LISTAGG(cols.COLUMN_NAME , ',') WITHIN GROUP (ORDER BY POSITION) AS PK_COLUMMN_LIST
--       cols.table_name, cols.column_name, cols.POSITION, cons.owner
FROM all_constraints cons, all_cons_columns cols
WHERE cols.OWNER LIKE 'ORACLE_OWNER_%'
AND cons.constraint_type = 'P'
AND cons.constraint_name = cols.constraint_name
AND cons.owner = cols.owner
GROUP BY  COLS.OWNER, COLS.TABLE_NAME
)


Multi-Table Inserts with Good and Bad Row Tables

Multi-Table Inserts with Good and Bad Row Tables

Many customers have asked me how to separate good rows from bad rows during a data load. You can use the validate table function to return all the errors encountered during the load. This may not be exactly what you need though.

What you may be looking for is a design pattern like this:

  • Load data from files into a raw table
  • Except for major errors, insert rows with minor data quality issues into the raw table
  • After loading the raw table, insert good rows to staging (if more processing to do) or production
  • At the same time, insert bad rows into a separate table for examination of data quality problems

You usually load Snowflake tables from files. Files are string data, so you can define all columns in your raw table as string type. This ensures simple errors will not disrupt the load process. Major errors such as an improper number of columns in a row will generate an error during the load. You can specify the appropriate copy option to set how you want Snowflake to handle major errors like this.

After defining a raw table, you can create a staging table or a production table. Either option uses proper data types instead of all strings. You’ll insert new rows to the target table while sending bad ones to a table containing the original bad values. You can then examine the bad rows to see why they failed to convert to the proper data types.

You can use the following SQL script as a template for how to use Snowflake multi-table Inserts to do this.

-- Create a staging table with all columns defined as strings.
-- This will hold all raw values from the load files.
create or replace table SALES_RAW
(                                       -- Actual Data Type
  SALE_TIMESTAMP            string,     -- timestamp
  ITEM_SKU                  string,     -- int
  PRICE                     string,     -- number(10,2)
  IS_TAXABLE                string,     -- boolean
  COMMENTS                  string      -- string
);

-- Create the production table with actual data types.
create or replace table SALES_STAGE
(
  SALE_TIMESTAMP            timestamp,
  ITEM_SKU                  int,
  PRICE                     number(10,2),
  IS_TAXABLE                boolean,
  COMMENTS                  string
);

-- Simulate adding some rows from a load file. Two rows are good.
-- Four rows generate errors when converting to the data types.
insert into SALES_RAW 
    (SALE_TIMESTAMP, ITEM_SKU, PRICE, IS_TAXABLE, COMMENTS) 
    values
    ('2020-03-17 18:21:34', '23289', '3.42',   'TRUE',  'Good row.'),
    ('2020-17-03 18:21:56', '91832', '1.41',   'FALSE', 'Bad row: SALE_TIMESTAMP has the month and day transposed.'),
    ('2020-03-17 18:22:03', '7O242', '2.99',   'T',     'Bad row: ITEM_SKU has a capital "O" instead of a zero.'),
    ('2020-03-17 18:22:10', '53921', '$6.25',  'F',     'Bad row: PRICE should not have a dollar sign.'),
    ('2020-03-17 18:22:17', '90210', '2.49',   'Foo',   'Bad row: IS_TAXABLE cannot be converted to true or false'),
    ('2020-03-17 18:22:24', '80386', '1.89',   '1',     'Good row.');

-- Make sure the rows inserted okay.
select * from SALES_RAW;

-- Create a table to hold the bad rows.
create or replace table SALES_BAD_ROWS like SALES_RAW;

-- Using multi-table inserts (https://docs.snowflake.net/manuals/sql-reference/sql/insert-multi-table.html)
-- Insert good rows into SALES_STAGE and bad rows into SALES_BAD_ROWS
insert  first
  when  SALE_TIMESTAMP_X is null and SALE_TIMESTAMP is not null or
        ITEM_SKU_X       is null and SALE_TIMESTAMP is not null or
        PRICE_X          is null and PRICE          is not null or
        IS_TAXABLE_X     is null and IS_TAXABLE     is not null
  then 
        into SALES_BAD_ROWS
            (SALE_TIMESTAMP, ITEM_SKU, PRICE, IS_TAXABLE, COMMENTS)
        values
            (SALE_TIMESTAMP, ITEM_SKU, PRICE, IS_TAXABLE, COMMENTS)  
  else 
        into SALES_STAGE 
            (SALE_TIMESTAMP, ITEM_SKU, PRICE, IS_TAXABLE, COMMENTS) 
         values 
            (SALE_TIMESTAMP_X, ITEM_SKU_X, PRICE_X, IS_TAXABLE_X, COMMENTS)
select  try_to_timestamp (SALE_TIMESTAMP)   as SALE_TIMESTAMP_X,
        try_to_number    (ITEM_SKU, 10, 0)  as ITEM_SKU_X,
        try_to_number    (PRICE, 10, 2)     as PRICE_X,
        try_to_boolean   (IS_TAXABLE)       as IS_TAXABLE_X,
                                               COMMENTS, 
                                               SALE_TIMESTAMP,
                                               ITEM_SKU,
                                               PRICE,
                                               IS_TAXABLE
from    SALES_RAW;

-- Examine the two good rows
select * from SALES_STAGE;

-- Examine the four bad rows
select * from SALES_BAD_ROWS;

If your incoming values have no nulls or a default value, you can eliminate the null check from the SQL. Now

  when  SALE_TIMESTAMP_X is null or
        ITEM_SKU_X       is null or
        PRICE_X          is null or
        IS_TAXABLE_X     is null 

This works because if the original value isn’t null, the only reason it would be null is type cast failure. There’s one final note on this section of the SQL. Why doesn’t the “when” section with several “and” and “or” operators need parenthesis?

The short answer is that AND has a higher operator precedence than the OR operator. This is true in SQL and most programming languages and seems familiar to many people. If it improves clarity you can add parenthesis. As an academic exercise, this shows the operator precedence of “and” and “or”.

select TRUE and TRUE or FALSE and FALSE; -- In operator precedence, AND comes first, then left to right. This evaluates to TRUE.

-- Processing AND first
select (TRUE and TRUE) or (FALSE and FALSE); -- This is functionally equivalent to the above statement.

-- Processing OR first
select TRUE and (TRUE or FALSE) and FALSE; -- This shows what would happen if OR had higher operator precedence

-- Processing only left to right
select ((TRUE and TRUE) or FALSE) and FALSE; -- This shows what would happen with no operator precedence, just left to right

Snowflake UDF to Get Payment Card Type

Snowflake UDF to Get Payment Card Type

Payment Cards

This User Defined Function (UDF) doesn’t require much explanation. Payment card number goes in; payment card type comes out. Since it is designed for speed, it does not validate the check digit. A subsequent post will provide a UDF to validate the check digit using the Luhn algorithm.

/********************************************************************************************************************

Function:    PaymentCardType
Description: Decodes the type of payment card from Visa, Mastercard, AMEX, etc.
Parameters:  A string indicating the type of payment card, or a blank string if not identified. 

*********************************************************************************************************************/
create or replace function PaymentCardType(cardNumber string)
  returns string 
  language javascript
  strict
  as '
     
    //Remove all spaces and dashes. Simply ignore them.
    NUMBER = CARDNUMBER.replace(/ /g, "");
    NUMBER = NUMBER.replace(/-/g, "");
     
     
    // Visa
    var re = new RegExp("(4[0-9]{15})");
    if (NUMBER.match(re) != null)
        return "Visa";

    // Mastercard
    re = new RegExp("(5[1-5][0-9]{14})");
    if (NUMBER.match(re) != null)
        return "Mastercard";

    // AMEX
    re = new RegExp("^3[47]");
    if (NUMBER.match(re) != null)
        return "AMEX";

    // Discover
    re = new RegExp("^(6011|622(12[6-9]|1[3-9][0-9]|[2-8][0-9]{2}|9[0-1][0-9]|92[0-5]|64[4-9])|65)");
    if (NUMBER.match(re) != null)
        return "Discover";

    // Diners
    re = new RegExp("^36");
    if (NUMBER.match(re) != null)
        return "Diners";

    // Diners - Carte Blanche
    re = new RegExp("^30[0-5]");
    if (NUMBER.match(re) != null)
        return "Diners - Carte Blanche";

    // JCB
    re = new RegExp("^35(2[89]|[3-8][0-9])");
    if (NUMBER.match(re) != null)
        return "JCB";

    // Visa Electron
    re = new RegExp("^(4026|417500|4508|4844|491(3|7))");
    if (NUMBER.match(re) != null)
        return "Visa Electron";

    return "";
 
  ';

-- Test the UDF:
select PaymentCardType('4470653497431234');

Field Comparisons Using Snowflake

Field Comparisons Using Snowflake

Use cases for bulk field comparisons

There are a lot of reasons why it may be necessary to compare the values of some but not all fields in two tables. In billing reconciliation, one table may contain raw line items, and another table may contain lines in billing statements. Another common reason would be to verify that fields are accurate after undergoing transformation from the source system to a table optimized for analytics.

Obviously when moving and transforming data a lot can happen along the way. Probably the most common problem is missing rows, but there are any number of other problems: updates out of sync, data corruption, transformation logic errors, etc.

How to compare fields across tables in Snowflake

Fortunately, Snowflake’s super-fast table joining provides a great way to check for missing rows or differences in key fields between the tables. Without getting into Venn diagrams with inner, outer, left, right, etc., suffice it to say we’re going to discuss what is perhaps the least used join: the full outer exclusive of inner join. I’ve seen this type of join called other names, but this is what it does:

Think of it this way for the present use case: The excluded inner join excludes the rows with key fields that compare properly. In other words, if our reconciliation process on key fields between tables A and B is perfect, an inner join will return all rows. Turning that on its head, the inverse of an inner join (a full join exclusive of inner join) will return only the rows that have key field compare mismatches.

Snowflake performance for massive-scale field comparisons

The TPCH Orders tables used as a source has 150 million rows in it. Using this approach to compare four field values on 150 million rows, the equivalent of doing 600 million comparisons completed in ~12 seconds on an extra large cluster. This level of performance exceeds by orders of magnitude typical approaches such as using an ETL platform to perform comparisons and write a table of mismatched rows.

We can see how this works in the following Snowflake worksheet:

-- Set the context
use warehouse TEST;
use database TEST;
create or replace schema FIELD_COMPARE;
use schema FIELD_COMPARE;

-- Note: This test goes more quickly and consumes the same number of credits by temporarily
--       scaling the TEST warehouse to extra large. The test takes only a few minutes.
--       Remember to set the warehouse to extra small when done with the table copies and query.
--       The test will work on an extra small warehouse, but it will run slower and consume the
--       same number of credits as running on an extra large and finishing quicker.
alter warehouse TEST set warehouse_size = 'XLARGE';

-- Get some test data, in this case 150 million rows from TPCH Orders
create table A as select * from SNOWFLAKE_SAMPLE_DATA.TPCH_SF100.ORDERS;
create table B as select * from SNOWFLAKE_SAMPLE_DATA.TPCH_SF100.ORDERS;

-- Quick check to see if the copy looks right.
select * from A limit 10;
select * from B limit 10;

-- We will now check to be sure the O_ORDERKEY, O_CUSTKEY, O_TOTALPRICE, and O_ORDERDATE fields
-- compare properly between the two tables. The query result will be any comparison problems.
-- Because we have copied table A and B from the same source, they should be identical. We expect
-- That the result set will have zero rows. 
select A.O_ORDERKEY      as A_ORDERKEY,
       A.O_CUSTKEY       as A_CUSTKEY,
       A.O_ORDERSTATUS   as A_ORDERSTATUS,
       A.O_TOTALPRICE    as A_TOTALPRICE,
       A.O_ORDERDATE     as A_ORDERDATE,
       A.O_ORDERPRIORITY as A_ORDERPRIORITY,
       A.O_CLERK         as A_CLERK,
       A.O_SHIPPRIORITY  as A_SHIPPRIORITY,
       A.O_COMMENT       as A_COMMENT,
       B.O_ORDERKEY      as B_ORDERKEY,
       B.O_CUSTKEY       as B_CUSTKEY,
       B.O_ORDERSTATUS   as B_ORDERSTATUS,
       B.O_TOTALPRICE    as B_TOTALPRICE,
       B.O_ORDERDATE     as B_ORDERDATE,
       B.O_ORDERPRIORITY as B_ORDERPRIORITY,
       B.O_CLERK         as B_CLERK,
       B.O_SHIPPRIORITY  as B_SHIPPRIORITY,
       B.O_COMMENT       as B_COMMENT
from A
full outer join B
on A.O_ORDERKEY   = B.O_ORDERKEY   and
   A.O_CUSTKEY    = B.O_CUSTKEY    and
   A.O_TOTALPRICE = B.O_TOTALPRICE and
   A.O_ORDERDATE  = B.O_ORDERDATE 
where A.O_ORDERKEY   is null or 
      B.O_ORDERKEY   is null or
      A.O_CUSTKEY    is null or
      B.O_CUSTKEY    is null or
      A.O_TOTALPRICE is null or
      B.O_TOTALPRICE is null or
      A.O_ORDERDATE  is null or
      B.O_ORDERDATE  is null;

-- Now we want to start changing some data to show comparison problems and the results. Here are some ways to do it.

-- Get two random clerks
select * from B tablesample(2);

-- Count the rows for these clerks - it should be about 3000 rows 
select count(*) from B where O_CLERK = 'Clerk#000065876' or O_CLERK = 'Clerk#000048376'; 

-- Now we can force some comparison problems. Perform one or more of the following:
-- NOTE: *** Do one or more of the following three changes or choose your own to force comparison problems. ***

-- Force comparison problem 1: Change about 3000 rows to set the order price to zero.
update B set O_TOTALPRICE = 0 where where O_CLERK = 'Clerk#000065876' or O_CLERK = 'Clerk#000048376';

-- Force comparison problem 2: Delete about 3000 rows.
delete from B where O_CLERK = 'Clerk#000065876' or O_CLERK = 'Clerk#000048376';

-- Force comparison problem 3: Insert a new row in only one table.
insert into B (O_ORDERKEY, O_CUSTKEY, O_ORDERSTATUS, O_TOTALPRICE, O_ORDERDATE) values (12345678, 12345678, 'O', 99.99, '1999-12-31');

-- Now run the same join above to see the results. You if you make any changes to the joined fields, you should see rows.
-- INSERT of a row to table B will show up as ONE row, A side all NULL and B side with values.
-- UPDATE of a row to table B will show up as TWO rows, one row A side with values and B side with all NULL, and one row the other way
-- DELETE of a row in table B will show up as ONE row, values in the A side and B side all NULL 

-- Clean up:
drop table A;
drop table B;
drop schema FIELD_COMPARE;
alter warehouse TEST set warehouse_size = 'XSMALL';
alter warehouse TEST suspend;


Theme: Overlay by Kaira