Snowflake supports overloading user defined functions. It’s a great way to handle function calls with parameters of different data types or different numbers of parameters. Developers often overload functions to let users send only relevant parameters.
Consider the common SUBSTRING function. You can call it using one of two overloads:
In the first statement, the caller sent the string to use and the start position. Omitting the final parameter uses the overload with default behavior, returning to the end of the string.
In the second statement, the caller decided to get rid of the final period. Adding the third parameter for length used the other overload to return five characters instead of the default behavior.
This is a common design with overloaded functions. Mandatory parameters go on the left and optional parameters follow. Each allowable combination of parameters becomes an overload of the function. In this design, developers typically write one base function with all parameters. For the overloads with missing parameters, they’ll call the base function using a default value for the missing parameter(s).
This design ensures that there’s only one place to maintain and debug code. The problem is Snowflake JavaScript UDFs cannot call other UDFs. While one way to deal with this is to write the same code in all overloads, it means three places to maintain, improve, and debug code. Fortunately, there’s a way to write once base function and call it from overloaded functions using defaults.
The solution is to write the base UDF with all parameters in JavaScript. For the overloads that simply call the base function using defaults for missing parameters, call the base JavaScript UDF using an overloaded SQL UDF. This works because SQL UDFs can call other UDFs, which JavaScript UDFs cannot do.
In this example, the JavaScript UDF returns a column displaying a graphical progress bar. The opens are typical for progress bars: percent completion, number of decimal places to display on the percentage, and number of segments to display.
The only one that can’t be defaulted is the percent complete. It’s okay to default to two decimal points and ten segments.
-- Make a progress bar function that looks like this:   ⬛⬛⬜⬜⬜⬜⬜⬜⬜⬜ 24.53%

-- This is the main JavaScript function with all parameters.
create or replace function PROGRESS_BAR(PERCENTAGE float, DECIMALS float, SEGMENTS float)
returns string
language javascript
as
$$

    var percent = PERCENTAGE;

    if (isNaN(percent)) percent =   0;
    if (percent < 0)    percent =   0;
    if (percent > 100)  percent = 100;

    percent        = percent.toFixed(DECIMALS);

    var filledSegments = Math.round(SEGMENTS * (percent / 100));
    var emptySegments  = SEGMENTS - filledSegments;

    var bar = '⬛'.repeat(filledSegments) + '⬜'.repeat(emptySegments);

    return bar + " " + percent + "%";

$$;

-- This is an overload with only the percentage, using defaults for
-- number of segments and decimal points to display on percentage.
create or replace function PROGRESS_BAR(PERCENTAGE float)
returns string
language sql
as
$$
    select progress_bar(PERCENTAGE, 2, 10)
$$;

-- This is an overload with the percentage and the option set for the
-- number of decimals to display. It uses a default for number of segments.
create or replace function PROGRESS_BAR(PERCENTAGE float, DECIMALS float)
returns string
language sql
as
$$
    select progress_bar(PERCENTAGE, DECIMALS, 10)
$$;

-- Call the main JavaScript function by sending all three parameters:
select progress_bar(24.5293, 0, 100) as PROGRESS;

-- Call the overloaded SQL function by omitting the number of segments (segments defaults to 10):
select progress_bar(24.5293, 1) as PROGRESS;

-- Call the overloaded SQL function specifying only the percentage
-- (segments defaults to 10 and decimals to 2)
-- It should display like this:   ⬛⬛⬜⬜⬜⬜⬜⬜⬜⬜ 24.53%
select progress_bar(24.5293) as PROGRESS;
By the way, this UDF progress bar is fully functional. If you have a long-running process such as loading a large number of files, you can use it to monitor progress by refreshing the query periodically. Here’s an example using a long progress bar and 24.41%:
Many customers have asked me how to separate good rows from bad rows during a data load. You can use the validate table function to return all the errors encountered during the load. This may not be exactly what you need though.
What you may be looking for is a design pattern like this:
Load data from files into a raw table
Except for major errors, insert rows with minor data quality issues into the raw table
After loading the raw table, insert good rows to staging (if more processing to do) or production
At the same time, insert bad rows into a separate table for examination of data quality problems
You usually load Snowflake tables from files. Files are string data, so you can define all columns in your raw table as string type. This ensures simple errors will not disrupt the load process. Major errors such as an improper number of columns in a row will generate an error during the load. You can specify the appropriate copy option to set how you want Snowflake to handle major errors like this.
After defining a raw table, you can create a staging table or a production table. Either option uses proper data types instead of all strings. You’ll insert new rows to the target table while sending bad ones to a table containing the original bad values. You can then examine the bad rows to see why they failed to convert to the proper data types.
You can use the following SQL script as a template for how to use Snowflake multi-table Inserts to do this.
-- Create a staging table with all columns defined as strings.
-- This will hold all raw values from the load files.
create or replace table SALES_RAW
(                                       -- Actual Data Type
  SALE_TIMESTAMP            string,     -- timestamp
  ITEM_SKU                  string,     -- int
  PRICE                     string,     -- number(10,2)
  IS_TAXABLE                string,     -- boolean
  COMMENTS                  string      -- string
);

-- Create the production table with actual data types.
create or replace table SALES_STAGE
(
  SALE_TIMESTAMP            timestamp,
  ITEM_SKU                  int,
  PRICE                     number(10,2),
  IS_TAXABLE                boolean,
  COMMENTS                  string
);

-- Simulate adding some rows from a load file. Two rows are good.
-- Four rows generate errors when converting to the data types.
insert into SALES_RAW
    (SALE_TIMESTAMP, ITEM_SKU, PRICE, IS_TAXABLE, COMMENTS)
    values
    ('2020-03-17 18:21:34', '23289', '3.42',   'TRUE',  'Good row.'),
    ('2020-17-03 18:21:56', '91832', '1.41',   'FALSE', 'Bad row: SALE_TIMESTAMP has the month and day transposed.'),
    ('2020-03-17 18:22:03', '7O242', '2.99',   'T',     'Bad row: ITEM_SKU has a capital "O" instead of a zero.'),
    ('2020-03-17 18:22:10', '53921', '$6.25',  'F',     'Bad row: PRICE should not have a dollar sign.'),
    ('2020-03-17 18:22:17', '90210', '2.49',   'Foo',   'Bad row: IS_TAXABLE cannot be converted to true or false'),
    ('2020-03-17 18:22:24', '80386', '1.89',   '1',     'Good row.');

-- Make sure the rows inserted okay.
select * from SALES_RAW;

-- Create a table to hold the bad rows.
create or replace table SALES_BAD_ROWS like SALES_RAW;

-- Using multi-table inserts (https://docs.snowflake.net/manuals/sql-reference/sql/insert-multi-table.html)
-- Insert good rows into SALES_STAGE and bad rows into SALES_BAD_ROWS
insert  first
  when  SALE_TIMESTAMP_X is null and SALE_TIMESTAMP is not null or
        ITEM_SKU_X       is null and SALE_TIMESTAMP is not null or
        PRICE_X          is null and PRICE          is not null or
        IS_TAXABLE_X     is null and IS_TAXABLE     is not null
  then
        into SALES_BAD_ROWS
            (SALE_TIMESTAMP, ITEM_SKU, PRICE, IS_TAXABLE, COMMENTS)
        values
            (SALE_TIMESTAMP, ITEM_SKU, PRICE, IS_TAXABLE, COMMENTS)
  else
        into SALES_STAGE
            (SALE_TIMESTAMP, ITEM_SKU, PRICE, IS_TAXABLE, COMMENTS)
         values
            (SALE_TIMESTAMP_X, ITEM_SKU_X, PRICE_X, IS_TAXABLE_X, COMMENTS)
select  try_to_timestamp (SALE_TIMESTAMP)   as SALE_TIMESTAMP_X,
        try_to_number    (ITEM_SKU, 10, 0)  as ITEM_SKU_X,
        try_to_number    (PRICE, 10, 2)     as PRICE_X,
        try_to_boolean   (IS_TAXABLE)       as IS_TAXABLE_X,
                                               COMMENTS,
                                               SALE_TIMESTAMP,
                                               ITEM_SKU,
                                               PRICE,
                                               IS_TAXABLE
from    SALES_RAW;

-- Examine the two good rows
select * from SALES_STAGE;

-- Examine the four bad rows
select * from SALES_BAD_ROWS;
If your incoming values have no nulls or a default value, you can eliminate the null check from the SQL. Now
  when  SALE_TIMESTAMP_X is null or
        ITEM_SKU_X       is null or
        PRICE_X          is null or
        IS_TAXABLE_X     is null
This works because if the original value isn’t null, the only reason it would be null is type cast failure. There’s one final note on this section of the SQL. Why doesn’t the “when” section with several “and” and “or” operators need parenthesis?
The short answer is that AND has a higher operator precedence than the OR operator. This is true in SQL and most programming languages and seems familiar to many people. If it improves clarity you can add parenthesis. As an academic exercise, this shows the operator precedence of “and” and “or”.
select TRUE and TRUE or FALSE and FALSE; -- In operator precedence, AND comes first, then left to right. This evaluates to TRUE.

-- Processing AND first
select (TRUE and TRUE) or (FALSE and FALSE); -- This is functionally equivalent to the above statement.

-- Processing OR first
select TRUE and (TRUE or FALSE) and FALSE; -- This shows what would happen if OR had higher operator precedence

-- Processing only left to right
select ((TRUE and TRUE) or FALSE) and FALSE; -- This shows what would happen with no operator precedence, just left to right
Snowflake supports JavaScript stored procedures. You may choose to start by copying and modifying a sample Snowflake stored procedure from the documentation, often this one.
As you add more SQL statements, exception handling and increase code complexity, having all code in the main JavaScript function risks becoming spaghetti code.
Fortunately, Snowflake stored procedures allow more than one function. In JavaScript, helper functions are additional functions called from a main function.
It’s easy to write a helper function. Just before the main function’s final curly bracket, add the following:
function HelperFunction(stringIn) {

    //Do something here, and then return the value:
    var s = stringIn;
    return s;
}
You can also use the Snowflake Stored Procedure API inside helper functions. Here two helper functions using the Snowflake SP API that make your main function more readable and modular. ExecuteNonQuery executes a DML statement or SQL statement that does not return a table. ExecuteSingleValueQuery fetches the first row’s value for a specified column. You can use this to retrieve flags and settings or other values from control tables.
create or replace procedure SampleSP()
returns string
language javascript
as
$$
    var s;

    try{
        ExecuteNonQuery("create or replace table MY_NATION_TABLE like SNOWFLAKE_SAMPLE_DATA.TPCH_SF1.NATION;");
        ExecuteNonQuery("insert into MY_NATION_TABLE select * from SNOWFLAKE_SAMPLE_DATA.TPCH_SF1.NATION;");
        s = ExecuteSingleValueQuery("N_NAME", "select * from MY_NATION_TABLE where N_NATIONKEY = 24;");
        ExecuteNonQuery("drop table MY_NATION_TABLE;");
        return s;
    }
    catch(err){
        return err;
    }
// ----------------------------------------------------------------------------------
// Main function above; helper functions below

    function ExecuteNonQuery(queryString) {
        var out = '';
        cmd1 = {sqlText: queryString};
        stmt = snowflake.createStatement(cmd1);
        var rs;
        try{
            rs = stmt.execute();
            rs.next();
            out = "SUCCESS: " + rs.getColumnValue(1);
        }
        catch(err) {
            throw "ERROR: " + err.message.replace(/\n/g, " ");
        }
        return out;
    }

    function ExecuteSingleValueQuery(columnName, queryString) {
        var out;
        cmd1 = {sqlText: queryString};
        stmt = snowflake.createStatement(cmd1);
        var rs;
        try{
            rs = stmt.execute();
            rs.next();
            return rs.getColumnValue(columnName);
        }
        catch(err) {
            if (err.message.substring(0, 18) == "ResultSet is empty"){
                throw "ERROR: No rows returned in query.";
            } else {
                throw "ERROR: " + err.message.replace(/\n/g, " ");
            }
        }
        return out;
    }
$$;

call SampleSP();
These queries don’t need much explanation. I’ve had some customers request how to get a complete list of user privileges, often for auditing purposes. The two queries below will show the role hierarchy (which roles have been granted which other roles) and a complete list of effective permissions for each user.
For instance, if someone grants user ‘MARY’ the ‘PLAN_9’ role, and that role has a privilege to select from ‘TABLE_X”, then one row in the result will show that MARY can select from TABLE_X because she’s been granted the PLAN_9 role. All other users in the PLAN_9 role will also show a row with this set of user, role granting the privilege, and then the privilege itself.
Snowflake enforces a best practice for security and governance called RBAC, role based access control. Privileges go to roles, not directly to users. To grant a user a privilege, add the user to a role with the privilege.
-- The data returned by both queries is in the
-- SNOWFLAKE database, which has latency of up
-- to 3 hours to reflect changes

-- Get the effective role hierarchy for each user.
with
   -- CTE gets all the roles each role is granted
   ROLE_MEMBERSHIPS(ROLE_GRANTEE, ROLE_GRANTED_THROUGH_ROLE)
   as
    (
    select   GRANTEE_NAME, "NAME"
    from     SNOWFLAKE.ACCOUNT_USAGE.GRANTS_TO_ROLES
    where    GRANTED_TO = 'ROLE' and
             GRANTED_ON = 'ROLE' and
             DELETED_ON is null
    ),
    -- CTE gets all roles a user is granted
    USER_MEMBERSHIPS(ROLE_GRANTED_TO_USER, USER_GRANTEE, GRANTED_BY)
    as
     (
     select ROLE,
            GRANTEE_NAME,
            GRANTED_BY
     from SNOWFLAKE.ACCOUNT_USAGE.GRANTS_TO_USERS
     where DELETED_ON is null
     )
--
select
        USER_GRANTEE,
        case
            when ROLE_GRANTED_THROUGH_ROLE is null
                then ROLE_GRANTED_TO_USER
            else ROLE_GRANTED_THROUGH_ROLE
        end
        EFFECTIVE_ROLE,
        GRANTED_BY,
        ROLE_GRANTEE,
        ROLE_GRANTED_TO_USER,
        ROLE_GRANTED_THROUGH_ROLE
from    USER_MEMBERSHIPS U
    left join ROLE_MEMBERSHIPS R
        on U.ROLE_GRANTED_TO_USER = R.ROLE_GRANTEE
;

--------------------------------------------------------------------------------------------------

-- This gets all the grants for all of the users:
with
    ROLE_MEMBERSHIPS
        (
            ROLE_GRANTEE,
            ROLE_GRANTED_THROUGH_ROLE
        )
    as
    (
        -- This lists all the roles a role is in
        select   GRANTEE_NAME, "NAME"
        from     SNOWFLAKE.ACCOUNT_USAGE.GRANTS_TO_ROLES
        where    GRANTED_TO = 'ROLE' and
                 GRANTED_ON = 'ROLE' and
                 DELETED_ON is null
    ),
    USER_MEMBERSHIPS
        (
            ROLE_GRANTED_TO_USER,
            USER_GRANTEE,
            GRANTED_BY
        )
    as
     (
        select ROLE,GRANTEE_NAME,GRANTED_BY
        from SNOWFLAKE.ACCOUNT_USAGE.GRANTS_TO_USERS
        where DELETED_ON is null
     ),
    EFFECTIVE_ROLES
    (
        USER_GRANTEE,
        EFFECTIVE_ROLE,
        GRANTED_BY,
        ROLE_GRANTEE,
        ROLE_GRANTED_TO_USER,
        ROLE_GRANTED_THROUGH_ROLE
    )
    as
    (
        select
            USER_GRANTEE,
            case
                when ROLE_GRANTED_THROUGH_ROLE is null
                    then ROLE_GRANTED_TO_USER
                else ROLE_GRANTED_THROUGH_ROLE
            end
            EFFECTIVE_ROLE,
            GRANTED_BY,
            ROLE_GRANTEE,
            ROLE_GRANTED_TO_USER,
            ROLE_GRANTED_THROUGH_ROLE
        from USER_MEMBERSHIPS U
            left join ROLE_MEMBERSHIPS R
            on U.ROLE_GRANTED_TO_USER = R.ROLE_GRANTEE
    ),
    GRANT_LIST
        (
            CREATED_ON,
            MODIFIED_ON,
            PRIVILEGE,
            GRANTED_ON,
            "NAME",
            TABLE_CATALOG,
            TABLE_SCHEMA,
            GRANTED_TO,
            GRANTEE_NAME,
            GRANT_OPTION
        )
    as
    (
        -- This shows all the grants (other than to roles)
        select  CREATED_ON,
                MODIFIED_ON,
                PRIVILEGE,
                "NAME",
                TABLE_CATALOG,
                TABLE_SCHEMA,
                GRANTED_TO,
                GRANTEE_NAME,
                GRANT_OPTION,
                GRANTED_ON
        from    SNOWFLAKE.ACCOUNT_USAGE.GRANTS_TO_ROLES
        where   GRANTED_ON <> 'ROLE' and
                PRIVILEGE <> 'USAGE' and
                DELETED_ON is null
    )
select * from EFFECTIVE_ROLES R
    left join GRANT_LIST G
        on G.GRANTED_TO = R.EFFECTIVE_ROLE
where G.PRIVILEGE is not null
;
A customer requested the ability to execute multiple SQL statements that result from a query. Today I learned about a new use case that required some augmentation of the stored procedure. Specifically, what happens when one of the many generated SQL statements encounters an error?
This updated stored procedure handles generated SQL statements that may encounter an error. You have two options to handle errors — report errors and continue or report first error and stop.
The stored procedure is overloaded, meaning that you can call it with or without the second parameter “continueOnError”. If you do not supply the second parameter, it will default to false and stop after the first error.
The output of the stored procedure is as follows:
<SQL statement to run> --Succeeded
<SQL statement to run> --Failed: <reason for failure>
By indicating the success or failure status as a SQL comment, you can modify and re-run the line manually or do some troubleshooting.
use database TEST;
use warehouse TEST;

create or replace procedure RunBatchSQL(sqlCommand String)
    returns string
    language JavaScript
as
$$
/**
 * Stored procedure to execute multiple SQL statements generated from a SQL query
 * Note that this procedure will always use the column named "SQL_COMMAND"
 * This overload of the function will stop after encountering the first error.
 *
 * @param {String} sqlCommand: The SQL query to run to generate one or more SQL commands
 * @return {String}: A string containing all the SQL commands executed, each separated by a newline.
 */
      cmd1_dict = {sqlText: SQLCOMMAND};
      stmt = snowflake.createStatement(cmd1_dict);
      rs = stmt.execute();
      var s = '';
      var CONTINUEONERROR = false; // Default to false for overloaded function
      while (rs.next()) {
          try{
                cmd2_dict = {sqlText: rs.getColumnValue("SQL_COMMAND")};
                stmtEx = snowflake.createStatement(cmd2_dict);
                stmtEx.execute();
                s += rs.getColumnValue(1) + " --Succeeded" + "\n";
             }
          catch(err) {
                s += rs.getColumnValue(1) + " --Failed: " + err.message.replace(/\n/g, " ") + "\n";
                if (!CONTINUEONERROR) return s;
          }
      }
      return s;
$$;

create or replace procedure RunBatchSQL(sqlCommand String, continueOnError Boolean)
    returns string
    language JavaScript
as
$$
/**
 * Stored procedure to execute multiple SQL statements generated from a SQL query
 * Note that this procedure will always use the column named "SQL_COMMAND".
 * This overload of the function will continue on errors if "continueOnError" = true.
 *
 * @param {String} sqlCommand: The SQL query to run to generate one or more SQL commands
 * @param {Boolean} continueOnError: If true, continues on error. If false, stops after first error.
 * @return {String}: A string containing all the SQL commands executed, each separated by a newline.
 */
      cmd1_dict = {sqlText: SQLCOMMAND};
      stmt = snowflake.createStatement(cmd1_dict);
      rs = stmt.execute();
      var s = '';
      while (rs.next()) {
          try{
                cmd2_dict = {sqlText: rs.getColumnValue("SQL_COMMAND")};
                stmtEx = snowflake.createStatement(cmd2_dict);
                stmtEx.execute();
                s += rs.getColumnValue(1) + " --Succeeded" + "\n";
             }
          catch(err) {
                s += rs.getColumnValue(1) + " --Failed: " + err.message.replace(/\n/g, " ") + "\n";
                if (!CONTINUEONERROR) return s;
          }
      }
      return s;
$$
;

-- This is a select query that will generate a list of SQL commands to excute, in this case some grant statements.
-- This SQL will generate rows to grant select on all tables for the DBA role (change to specify another role).
select distinct ('grant select on table ' || table_schema || '.' || table_name || ' to role DBA;') AS SQL_COMMAND
from INFORMATION_SCHEMA.TABLE_PRIVILEGES
where TABLE_SCHEMA <> 'AUDIT'
order by SQL_COMMAND;

-- As a convienience, this grabs the last SQL run so that it's easier to insert into the parameter used to call the stored procedure.
set query_text = (  select QUERY_TEXT
                    from table(information_schema.query_history(result_limit => 2))
                    where SESSION_ID = Current_Session() and QUERY_TYPE = 'SELECT' order by START_TIME desc);

-- Confirm that the query_text variable has the correct SQL query to generate our SQL commands (grants in this case) to run.
select $query_text as QUERY_TEXT;

-- Run the stored procedure. Note that to view its output better, double click on the output to see it in multi-line format,
Call RunBatchSQL($query_text, true);

--Check the last several queries run to make sure it worked.
select QUERY_TEXT
from table(information_schema.query_history(result_limit => 100))
where SESSION_ID = Current_Session() order by START_TIME desc;
A customer sent me an interesting request today asking how to connect Microsoft Access to Snowflake. I connected Excel to Snowflake, but had never tried with Access. I thought that since they’re both Microsoft Office products, it would work pretty much the same. That turned out not to be the case, at least at first.
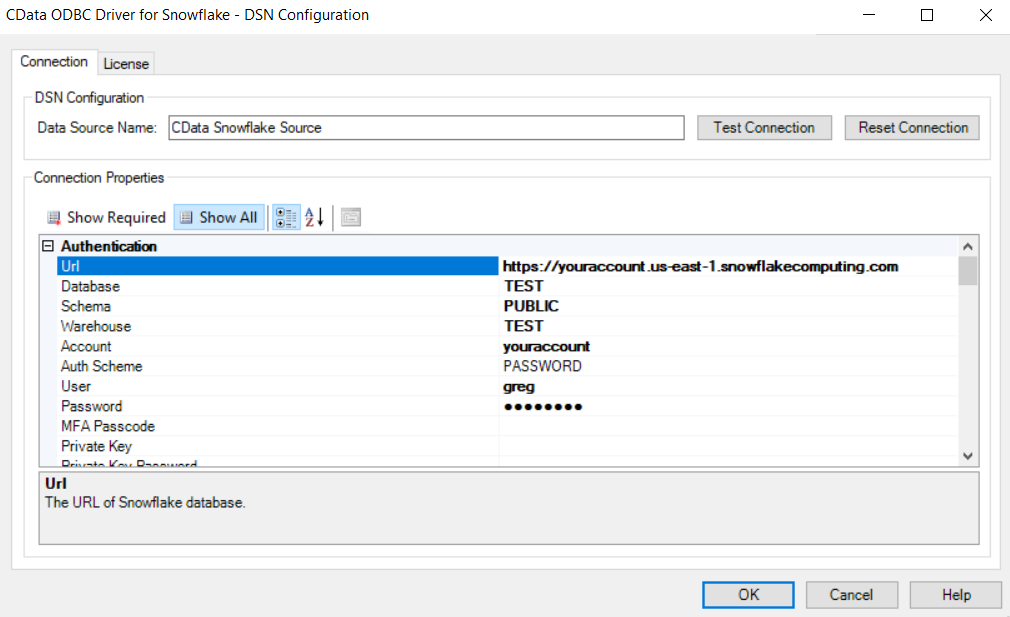
A bit of research indicated that Access doesn’t ask for credentials; you have to store them in the Data Source Name (DSN). It’s possible to use Visual Basic for Applications (VBA) to ask for credentials each use, but it introduces other issues. On the other side of the connection, Snowflake does not store credentials in the ODBC DSN. You have a standoff situation.
Fortunately there’s an easy and robust solution. CData, a company specializing in data access and connectivity solutions, has a Snowflake ODBC driver. CData has a reputation for high-quality products. Developers often choose to use their ODBC or other connectors instead of the ones database companies provide free. The CData ODBC driver for Snowflake comes with a 30-day free trial and is bi-directional. You can read from and write to Snowflake with it.
Connecting Access to Snowflake is easy. In the “Url” box, take your Snowflake URL and enter the complete URL up to and including “snowflakecomputing.com” and enter it. In the “Account” box, enter just the first part after https:// not including any indicator of location such as us-east1. For example:
This User Defined Function (UDF) doesn’t require much explanation. Payment card number goes in; payment card type comes out. Since it is designed for speed, it does not validate the check digit. A subsequent post will provide a UDF to validate the check digit using the Luhn algorithm.
/********************************************************************************************************************

Function:    PaymentCardType
Description: Decodes the type of payment card from Visa, Mastercard, AMEX, etc.
Parameters:  A string indicating the type of payment card, or a blank string if not identified.

*********************************************************************************************************************/
create or replace function PaymentCardType(cardNumber string)
  returns string
  language javascript
  strict
  as '

    //Remove all spaces and dashes. Simply ignore them.
    NUMBER = CARDNUMBER.replace(/ /g, "");
    NUMBER = NUMBER.replace(/-/g, "");


    // Visa
    var re = new RegExp("(4[0-9]{15})");
    if (NUMBER.match(re) != null)
        return "Visa";

    // Mastercard
    re = new RegExp("(5[1-5][0-9]{14})");
    if (NUMBER.match(re) != null)
        return "Mastercard";

    // AMEX
    re = new RegExp("^3[47]");
    if (NUMBER.match(re) != null)
        return "AMEX";

    // Discover
    re = new RegExp("^(6011|622(12[6-9]|1[3-9][0-9]|[2-8][0-9]{2}|9[0-1][0-9]|92[0-5]|64[4-9])|65)");
    if (NUMBER.match(re) != null)
        return "Discover";

    // Diners
    re = new RegExp("^36");
    if (NUMBER.match(re) != null)
        return "Diners";

    // Diners - Carte Blanche
    re = new RegExp("^30[0-5]");
    if (NUMBER.match(re) != null)
        return "Diners - Carte Blanche";

    // JCB
    re = new RegExp("^35(2[89]|[3-8][0-9])");
    if (NUMBER.match(re) != null)
        return "JCB";

    // Visa Electron
    re = new RegExp("^(4026|417500|4508|4844|491(3|7))");
    if (NUMBER.match(re) != null)
        return "Visa Electron";

    return "";

  ';

-- Test the UDF:
select PaymentCardType('4470653497431234');
The term stream has a lot of usages and meanings in information technology. This is one of the reasons the Snowflake stream feature has excited interest, but also raised confusion. Technologists often use the term stream interchangeably with a platform for handling a real-time data feed, such as Kafka. Snowflake streams are something different.
Often distinctions in technology are subtle. Fortunately this isn’t one of those times. Snowflake streams are nothing like Kafka, Spark Streaming or Flume. They capture change data, i.e., CDC and show the changes in a table. Also, Snowflake streams are not always “streaming”. They capture changes to a table whether they’re happening in a stream, micro-batches, or batch processes.
Why use stream tables
There are lots of reasons. One of the most common is keeping a staging table and production table in sync. Before discussing how, let’s discuss why you might want to have a staging table at all. Why not just process changes directly in the production table?
The main reason is to protect the production table from bad changes. Perhaps a load terminated abnormally due to file corruption, or a delete zapped more rows than planned. It’s better to back off those changes and clean up in a staging table than in a production table. Once you’re satisfied that the changes are ready to promote to production (satisfied by automatic check or manual action), you can use the change data captured in the stream to synchronize the changes to the production table.
Of course, that’s only one reason to use a CDC stream. Since it’s the most straightforward, let’s start with that one. Snowflake streams provide a powerful way to deal with changing data sets. I’ll discuss some very intriguing uses for streams in future posts.
Simplifying how to use streams
The documentation for streams is comprehensive. It covers a great deal of ground, attempting to show every capability and option. In contrast, this article presents a single simplified use case. Specifically, the common use case of pushing all changes to a staging table, and using a CDC stream to control changes to a corresponding production table. Hopefully this will allow the reader to learn from a simple example, tinker with it, and come up with your own uses.
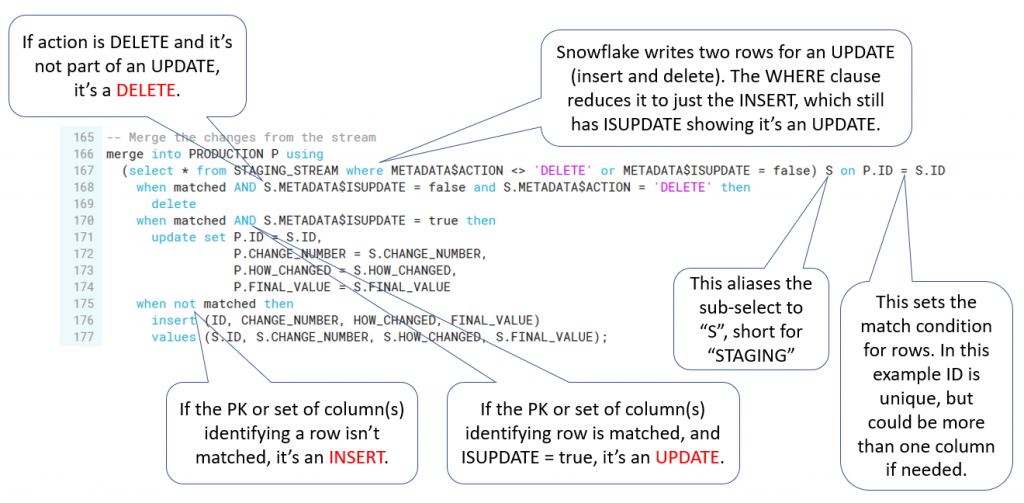
The SQL script walks through the key concepts of Snowflake streams. A subsequent post will elaborate on some key aspects of how and why streams work the way they do. The final two SQL statements merit some discussion. The next to last one shows that a single merge statement can perform 100% of the insert, delete, and update operations in the stream in a single step. Rather than expecting you to reverse-engineer why that is, there’s an annotated SQL explaining how it works. The very last SQL statement is a handy (and in Snowflake very rapid) way to dump any differences between any number of columns in two tables.
-- Set the context. Be sure to use a test database and extra small
-- test warehouse.
use warehouse TEST;
use database TEST;
use role SYSADMIN;

-- Create a schema to test streams
create or replace schema TEST_STREAMS;

-- Create a STAGING table to hold our changed data for our CDC pipeline
create or replace table STAGING
  (ID int, CHANGE_NUMBER string, HOW_CHANGED string, FINAL_VALUE string);

-- Create the target PRODUCTION table with a schema identical to STAGING
create or replace table PRODUCTION like STAGING;

-- Create a stream on the STAGING table
create or replace stream STAGING_STREAM on table STAGING;

-- Examine the STAGING table... It's a simple, four-column table:
select * from STAGING;

-- Examine the STAGING_STREAM... It's got 3 new columns called
-- METADATA$ACTION, METADATA$ISUPDATE, and METADATA$ROW_ID
select * from STAGING_STREAM;

-- 1st change to STAGING table
-- Let's insert three rows into the STAGING table:
insert into STAGING (ID, CHANGE_NUMBER, HOW_CHANGED, FINAL_VALUE) values
    (1, '1st change to STAGING table', 'Inserted', 'Original Row 1 Value'),
    (2, '1st change to STAGING table', 'Inserted', 'Original Row 2 Value'),
    (3, '1st change to STAGING table', 'Inserted', 'Original Row 3 Value');

-- Let's look at the STAGING table now to see our three rows:
select * from STAGING;

-- Now, let's look at our stream. Notice there are three "INSERT" metadata
-- actions and three FALSE for metadata "ISUPDATE":
select * from STAGING_STREAM;

-- The documentation for streams discusses how DML operations will advance the
-- position of the stream. Note that a SELECT is *not* a DML operation, and will
-- not advance the stream. Let's run the select again and see all three rows are
-- still there no matter how many times we SELECT from the stream:
select * from STAGING_STREAM;

-- Recall that a Snowflake stream indicates all the changes you need to make
-- to keep a target table (PRODUCTION) in sync with the staging table where the
-- stream is tracking the changes (STAGING). With this preamble, can you guess
-- what will happen when you delete all rows in the staging table *before*
-- you consume the stream?

-- 2st change to STAGING table
delete from STAGING;

-- Let's SELECT from STAGING_STREAM and see what's there:
select * from STAGING_STREAM;

-- There are no rows. Why is this? Why does the stream not show the three
-- inserted rows and then the three deleted rows? Recall the underlying purpose
-- of Snowflake streams, to keep a staging and production table in sync. Since
-- we inserted and deleted the rows *before* we used (consumed) the stream in
-- a DML action, we didn't need to insert and delete the rows to sync the tables.

-- Now, let's reinsert the rows:

-- 3rd change to STAGING table
insert into STAGING (ID, CHANGE_NUMBER, HOW_CHANGED, FINAL_VALUE) values
  (1, '3rd change to STAGING table', 'Inserted after deleted', 'Original Row 1 Value'),
  (2, '3rd change to STAGING table', 'Inserted after deleted', 'Original Row 2 Value'),
  (3, '3rd change to STAGING table', 'Inserted after deleted', 'Original Row 3 Value');


-- Now let's look at the stream again. We expect to see three inserts of the
-- new change:
select * from STAGING_STREAM;

-- Okay, now let's show what happens when you use the stream as part of a DML
-- transaction, which is an INDERT, DELETE, UPDATE, or MERGE:
insert into PRODUCTION
  select ID, CHANGE_NUMBER, HOW_CHANGED, FINAL_VALUE from STAGING_STREAM;

-- The rows are in PRODUCTION:
select * from PRODUCTION;

-- But since you've "consumed" the stream (advanced its position by using rows
-- in a DML transaction), this will show no rows:
select * from STAGING_STREAM;

-- Why is this? It's helpful to think of the existence of rows in a stream (strictly
-- speaking, rows past the last consumed position of the stream) as an indication
-- that there have been unprocessed changes in your change data capture stream.
-- To see how this works, let's make some more changes:

-- Update a row to see how the stream responds:
update STAGING
set FINAL_VALUE = 'Updated Row 1 Value',
    HOW_CHANGED = 'Updated in change 4'
where ID = 1;

-- Examine the change in the staging table:
select * from STAGING;

-- Since the last time you consumed the stream, you have one UPDATE to process.
-- Let's see what that looks like in the stream:
select * from STAGING_STREAM;


-- There are *two* rows. Why is that? The reason is how Snowflake processes updates.
-- In order to enable Snowflake Time Travel and for technical reasons, Snowflake
-- processes an UPDATE as a DELETE and an INSERT. Note that we can tell this is
-- an update, because there's another column, "METADATA$ISUPDATE" set to TRUE.
-- Let's process this change. We'll start with the DELETE first:
delete from PRODUCTION
where ID in (select ID from STAGING_STREAM where METADATA$ACTION = 'DELETE');

-- We've now deleted row ID 1, let's check it and then do the INSERT:
select * from PRODUCTION;

-- But wait... What happened to the stream? Did it clear out only the DELETE
-- metadata action because that's the only one you used in the DML?

select * from STAGING_STREAM;

-- Answer: ** No **. Even though you didn't use every row in the stream, *any*
-- DML transaction advances the stream to the end of the last change capture.
-- You could use "begin" and "end" to do the INSERT and DELETE one after the
-- other, or we could use UPDATE by checking the "METADATA$ISUPDATE", but I'd
-- like to propose a better, general-purpose solution: MERGING from the stream.

-- Let's see how this works. First, let's get the PRODUCTION table back in sync
-- with the STAGING table:
delete from PRODUCTION;
insert into PRODUCTION select * from STAGING;

-- Now, let's do an INSERT, UPDATE, and DELETE before "consuming" the stream
select * from STAGING;

insert into STAGING (ID, CHANGE_NUMBER, HOW_CHANGED, FINAL_VALUE)
  values (4, '5th change to STAGING table', 'Inserted in change 5', 'Original Row 5 value');

update STAGING
  set CHANGE_NUMBER = '6th change to STAGING table', HOW_CHANGED = 'Updated in change 6'
  where ID = 2;

delete from STAGING where ID = 3;

-- Now your STAGING and PRODUCTION tables are out of sync. The stream captures
-- all changes (change data capture or CDC) needed to process to get the tables
-- in sync:
select * from STAGING_STREAM;

-- Note that we have *FOUR* rows after making one change for each verb
-- INSERT, UPDATE, and DELETE. Recall that Snowflake processes an UPDATE as
-- a DELETE followed by an INSERT, and shows this in the METADATA$ISUPDATE
-- metadata column.

-- What if all you want to do is keep PROD in sync with STAGING, but control
-- when those changes happen and have the option to examine them before
-- applying them? This next DML statement serves as a template to make this
-- use case super easy and efficient:

-- Let's look at the PRODUCTION table first:
select * from PRODUCTION;

-- Merge the changes from the stream. The graphic below this SQL explains
-- how this processes all changes in one DML transaction.
merge into PRODUCTION P using
  (select * from STAGING_STREAM where METADATA$ACTION <> 'DELETE' or METADATA$ISUPDATE = false) S on P.ID = S.ID
    when matched AND S.METADATA$ISUPDATE = false and S.METADATA$ACTION = 'DELETE' then
      delete
    when matched AND S.METADATA$ISUPDATE = true then
      update set P.ID = S.ID,
                 P.CHANGE_NUMBER = S.CHANGE_NUMBER,
                 P.HOW_CHANGED = S.HOW_CHANGED,
                 P.FINAL_VALUE = S.FINAL_VALUE
    when not matched then
      insert (ID, CHANGE_NUMBER, HOW_CHANGED, FINAL_VALUE)
      values (S.ID, S.CHANGE_NUMBER, S.HOW_CHANGED, S.FINAL_VALUE);

-- Recall that you did 1 INSERT, 1 UPDATE, and 1 DELETE. The stream captured
-- all three changes, and the MERGE statement above performed all three in one
-- step. Now the PRODUCTION table is in sync with STAGING:
select * from PRODUCTION;

-- We consumed the stream, so it's advanced past any changes to show there's
-- nothing remaining to process:
select * from STAGING_STREAM;

-- We can process CDC streams any way we want, but to synchronize a staging
-- and production table, this MERGE template works great.

-- BTW, here's a handy trick to see if two tables that are supposed to be in
-- sync actually are in sync. There's a complete post on it here:
-- https://snowflake.pavlik.us/index.php/2020/01/08/field-comparisons-using-snowflake/
-- This query will find any mismatched rows:
select P.ID            as P_ID,
       P.CHANGE_NUMBER as P_CHANGE_NUMBER,
       P.HOW_CHANGED   as P_HOW_CHANGED,
       P.FINAL_VALUE   as P_FINAL_VALUE,
       S.ID            as S_ID,
       S.CHANGE_NUMBER as S_CHANGE_NUMBER,
       S.HOW_CHANGED   as S_HOW_CHANGED,
       S.FINAL_VALUE   as S_FINAL_VALUE
from PRODUCTION P
full outer join STAGING S
on P.ID            = S.ID            and
   P.CHANGE_NUMBER = S.CHANGE_NUMBER and
   P.HOW_CHANGED   = S.HOW_CHANGED   and
   P.FINAL_VALUE   = S.FINAL_VALUE
where P.ID            is null or
      S.ID            is null or
      P.CHANGE_NUMBER is null or
      S.CHANGE_NUMBER is null or
      P.HOW_CHANGED   is null or
      S.HOW_CHANGED   is null or
      P.FINAL_VALUE   is null or
      S.FINAL_VALUE   is null;
Think of the final MERGE statement as a general-purpose way to merge changes from any staging table’s stream to its corresponding production table. In order to do that; however, you’ll need to modify the template a bit. The following graphic should help explain what’s going on here:
Administrators usually disable parent-child relational constraint enforcement, especially in OLAP databases. Snowflake allows definition of parent-child relationships, but currently does not enable enforcement. This approach enables documentation at the table and view level. It also allows integration with Entity Relationship Diagram (ERD) solutions or custom data dictionaries.
Snowflake stores the relationship information in the table Data Definition Language (DDL) representation of each table or view. Since there appears to be no centralized location to read the relationships, I wrote a Java project to capture them automatically.
In its present state it has some limitations. Chief among them is that I have tested it using only single-column primary and foreign keys. I think, though I have not yet confirmed, that it should work with multi-column keys. It could run into parsing issues due to differences in how Snowflake stores DDL lines for multi-column primary and foreign keys. This should be a simple problem to address, but I’ve not yet tested it.
The attached Java project, Snowflake_Utilities, has a class named SchemaInfo. The SchemaInfo class will collect more schema information in future updates. The initial preview focuses on collecting relationship information. It can:
Return a primary key for a table or view
Return all foreign keys defined for a table or view, along with the name and key on the parent
Get all primary keys for every table and view across an entire Snowflake account
Get all foreign keys for every table and view across an entire Snowflake account
The included Java source, exported from Eclipse, should be easy to configure. The main thing to add to the project build path is the latest Snowflake JDBC driver.
There are a lot of reasons why it may be necessary to compare the values of some but not all fields in two tables. In billing reconciliation, one table may contain raw line items, and another table may contain lines in billing statements. Another common reason would be to verify that fields are accurate after undergoing transformation from the source system to a table optimized for analytics.
Obviously when moving and transforming data a lot can happen along the way. Probably the most common problem is missing rows, but there are any number of other problems: updates out of sync, data corruption, transformation logic errors, etc.
How to compare fields across tables in Snowflake
Fortunately, Snowflake’s super-fast table joining provides a great way to check for missing rows or differences in key fields between the tables. Without getting into Venn diagrams with inner, outer, left, right, etc., suffice it to say we’re going to discuss what is perhaps the least used join: the full outer exclusive of inner join. I’ve seen this type of join called other names, but this is what it does:
Think of it this way for the present use case: The excluded inner join excludes the rows with key fields that compare properly. In other words, if our reconciliation process on key fields between tables A and B is perfect, an inner join will return all rows. Turning that on its head, the inverse of an inner join (a full join exclusive of inner join) will return only the rows that have key field compare mismatches.
Snowflake performance for massive-scale field comparisons
The TPCH Orders tables used as a source has 150 million rows in it. Using this approach to compare four field values on 150 million rows, the equivalent of doing 600 million comparisons completed in ~12 seconds on an extra large cluster. This level of performance exceeds by orders of magnitude typical approaches such as using an ETL platform to perform comparisons and write a table of mismatched rows.
We can see how this works in the following Snowflake worksheet:
-- Set the context
use warehouse TEST;
use database TEST;
create or replace schema FIELD_COMPARE;
use schema FIELD_COMPARE;

-- Note: This test goes more quickly and consumes the same number of credits by temporarily
--       scaling the TEST warehouse to extra large. The test takes only a few minutes.
--       Remember to set the warehouse to extra small when done with the table copies and query.
--       The test will work on an extra small warehouse, but it will run slower and consume the
--       same number of credits as running on an extra large and finishing quicker.
alter warehouse TEST set warehouse_size = 'XLARGE';

-- Get some test data, in this case 150 million rows from TPCH Orders
create table A as select * from SNOWFLAKE_SAMPLE_DATA.TPCH_SF100.ORDERS;
create table B as select * from SNOWFLAKE_SAMPLE_DATA.TPCH_SF100.ORDERS;

-- Quick check to see if the copy looks right.
select * from A limit 10;
select * from B limit 10;

-- We will now check to be sure the O_ORDERKEY, O_CUSTKEY, O_TOTALPRICE, and O_ORDERDATE fields
-- compare properly between the two tables. The query result will be any comparison problems.
-- Because we have copied table A and B from the same source, they should be identical. We expect
-- That the result set will have zero rows.
select A.O_ORDERKEY      as A_ORDERKEY,
       A.O_CUSTKEY       as A_CUSTKEY,
       A.O_ORDERSTATUS   as A_ORDERSTATUS,
       A.O_TOTALPRICE    as A_TOTALPRICE,
       A.O_ORDERDATE     as A_ORDERDATE,
       A.O_ORDERPRIORITY as A_ORDERPRIORITY,
       A.O_CLERK         as A_CLERK,
       A.O_SHIPPRIORITY  as A_SHIPPRIORITY,
       A.O_COMMENT       as A_COMMENT,
       B.O_ORDERKEY      as B_ORDERKEY,
       B.O_CUSTKEY       as B_CUSTKEY,
       B.O_ORDERSTATUS   as B_ORDERSTATUS,
       B.O_TOTALPRICE    as B_TOTALPRICE,
       B.O_ORDERDATE     as B_ORDERDATE,
       B.O_ORDERPRIORITY as B_ORDERPRIORITY,
       B.O_CLERK         as B_CLERK,
       B.O_SHIPPRIORITY  as B_SHIPPRIORITY,
       B.O_COMMENT       as B_COMMENT
from A
full outer join B
on A.O_ORDERKEY   = B.O_ORDERKEY   and
   A.O_CUSTKEY    = B.O_CUSTKEY    and
   A.O_TOTALPRICE = B.O_TOTALPRICE and
   A.O_ORDERDATE  = B.O_ORDERDATE
where A.O_ORDERKEY   is null or
      B.O_ORDERKEY   is null or
      A.O_CUSTKEY    is null or
      B.O_CUSTKEY    is null or
      A.O_TOTALPRICE is null or
      B.O_TOTALPRICE is null or
      A.O_ORDERDATE  is null or
      B.O_ORDERDATE  is null;

-- Now we want to start changing some data to show comparison problems and the results. Here are some ways to do it.

-- Get two random clerks
select * from B tablesample(2);

-- Count the rows for these clerks - it should be about 3000 rows
select count(*) from B where O_CLERK = 'Clerk#000065876' or O_CLERK = 'Clerk#000048376';

-- Now we can force some comparison problems. Perform one or more of the following:
-- NOTE: *** Do one or more of the following three changes or choose your own to force comparison problems. ***

-- Force comparison problem 1: Change about 3000 rows to set the order price to zero.
update B set O_TOTALPRICE = 0 where where O_CLERK = 'Clerk#000065876' or O_CLERK = 'Clerk#000048376';

-- Force comparison problem 2: Delete about 3000 rows.
delete from B where O_CLERK = 'Clerk#000065876' or O_CLERK = 'Clerk#000048376';

-- Force comparison problem 3: Insert a new row in only one table.
insert into B (O_ORDERKEY, O_CUSTKEY, O_ORDERSTATUS, O_TOTALPRICE, O_ORDERDATE) values (12345678, 12345678, 'O', 99.99, '1999-12-31');

-- Now run the same join above to see the results. You if you make any changes to the joined fields, you should see rows.
-- INSERT of a row to table B will show up as ONE row, A side all NULL and B side with values.
-- UPDATE of a row to table B will show up as TWO rows, one row A side with values and B side with all NULL, and one row the other way
-- DELETE of a row in table B will show up as ONE row, values in the A side and B side all NULL

-- Clean up:
drop table A;
drop table B;
drop schema FIELD_COMPARE;
alter warehouse TEST set warehouse_size = 'XSMALL';
alter warehouse TEST suspend;